Documentation
Configuring Microsoft365 with ExchangeDefender
Required for service
ExchangeDefender Inbound Connector
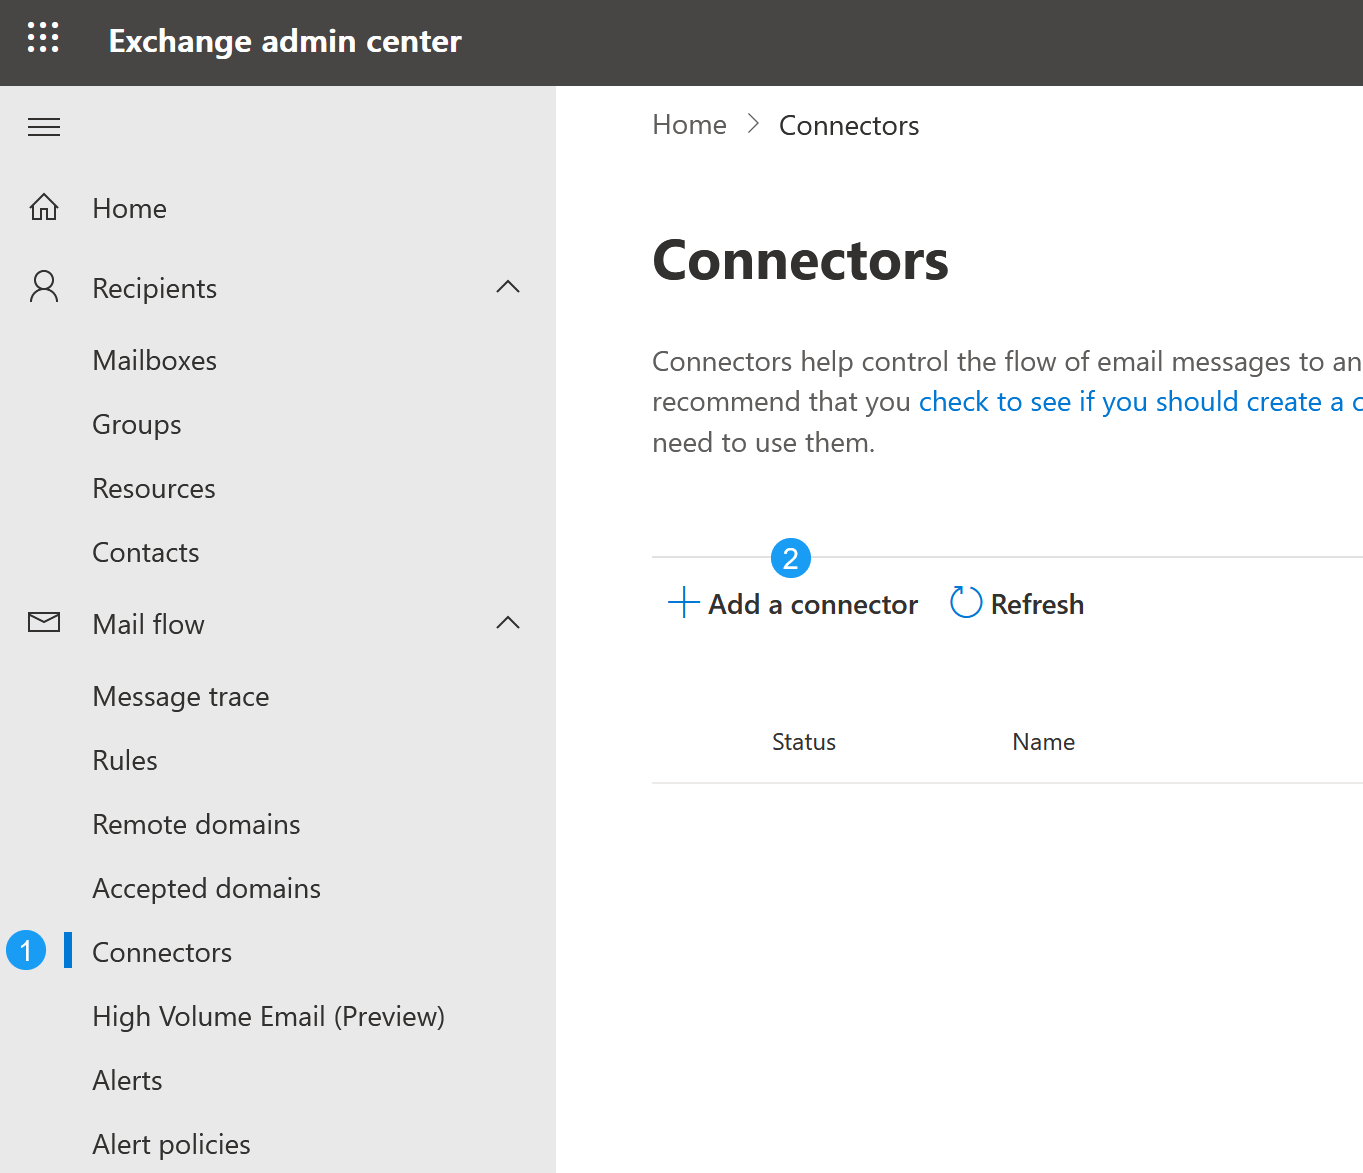
- To lock down your M365 tenant to only allow secure email that has been scanned by ExchangeDefender, you need to create a Connector at https://admin.exchange.microsoft.com. Click on Mail Flow -> Connectors and click on + Add a connector to get started.
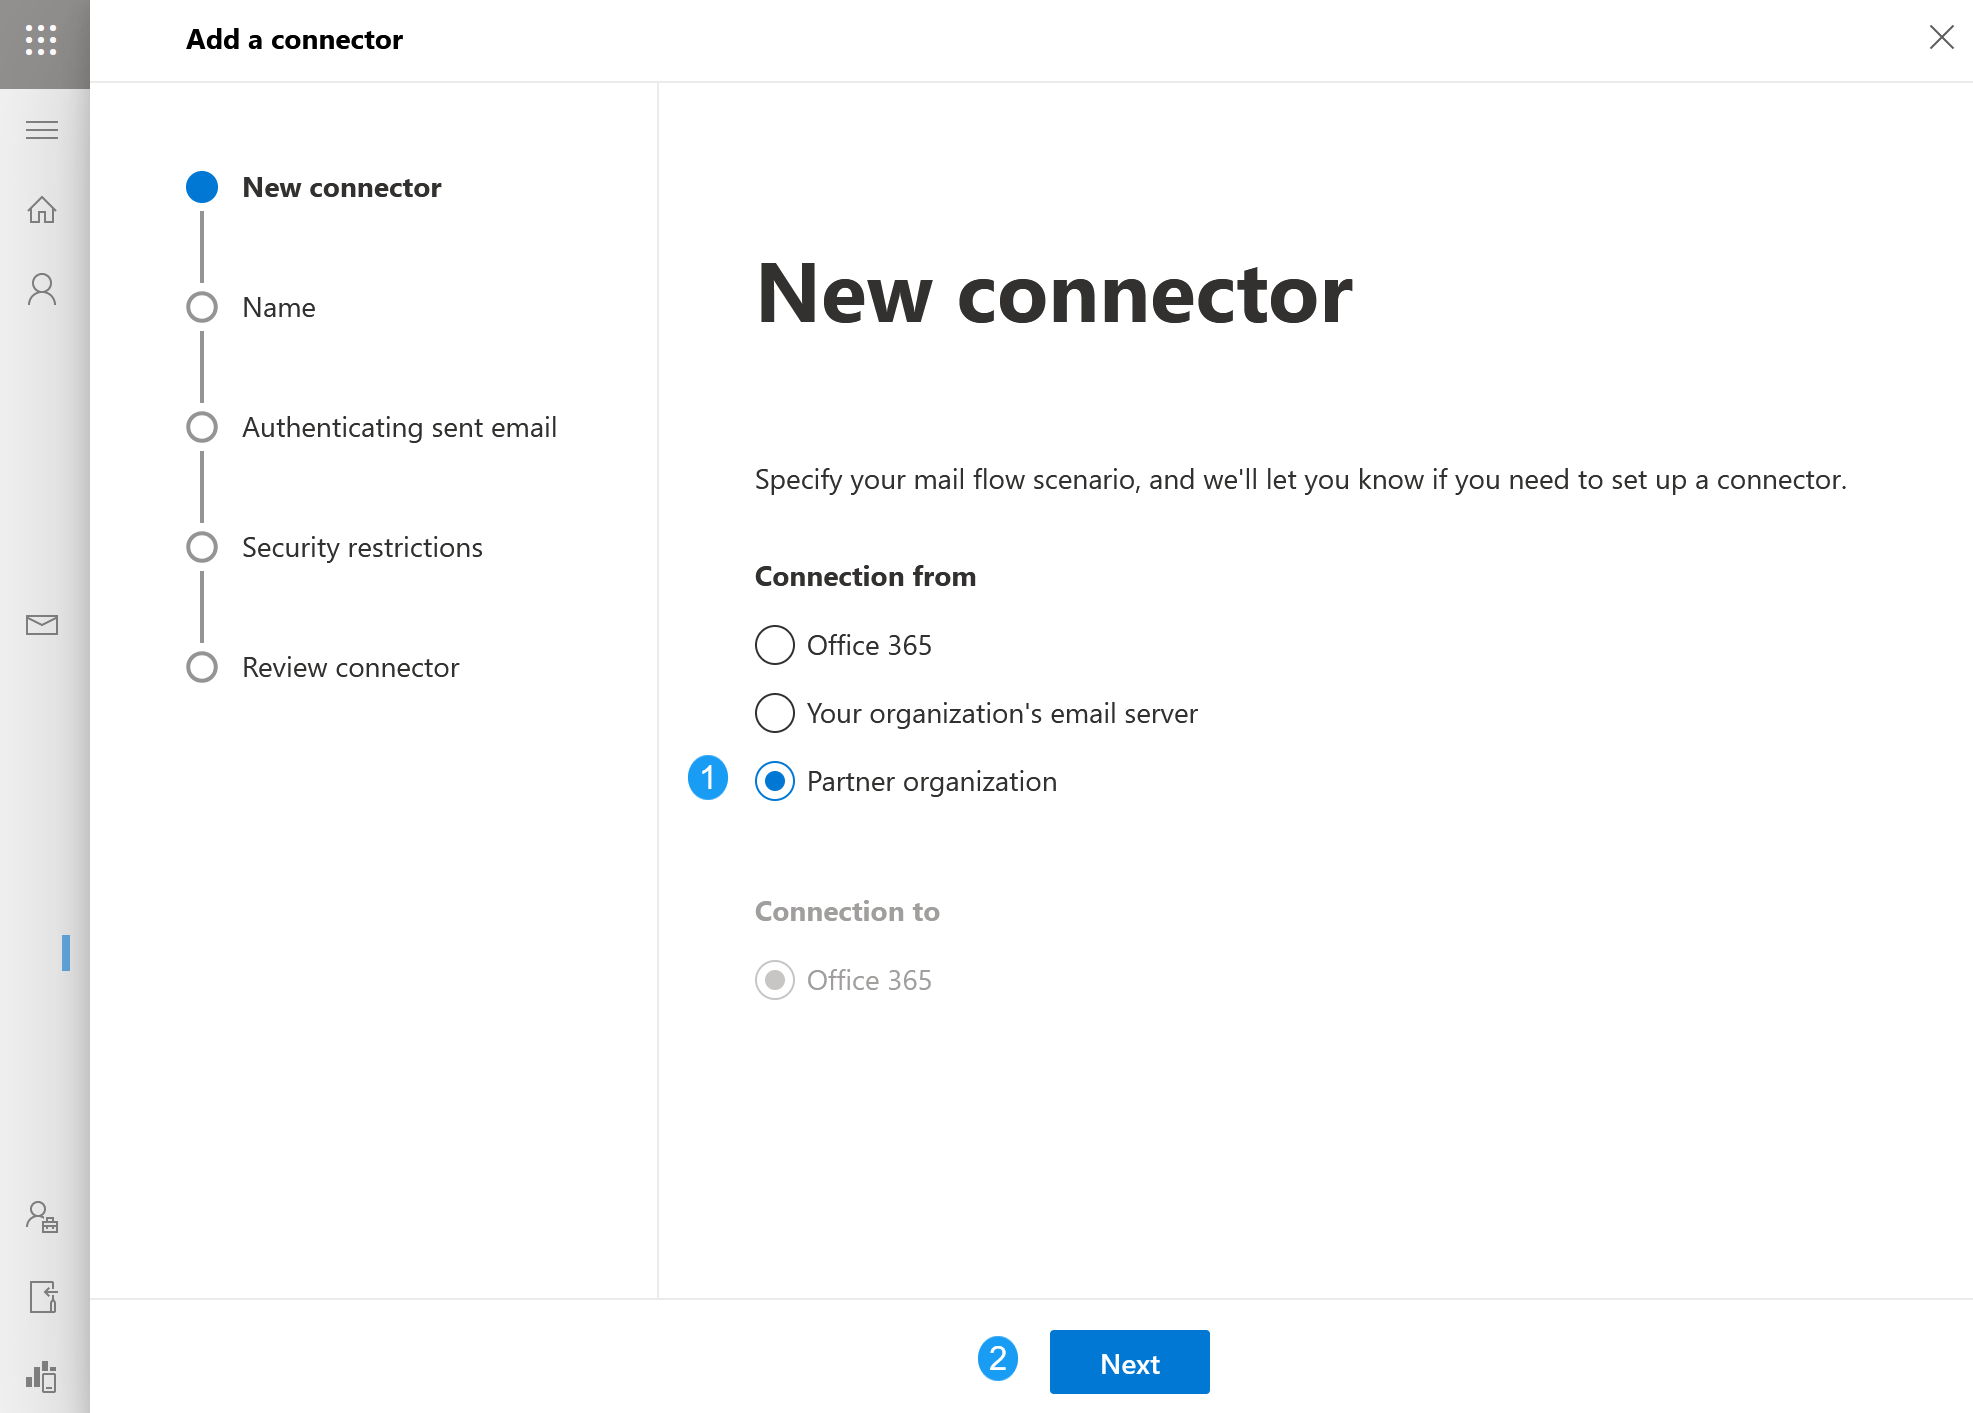
- You will be presented with a modal for New Connector. Click on Partner organization and then click on Next. (edited)
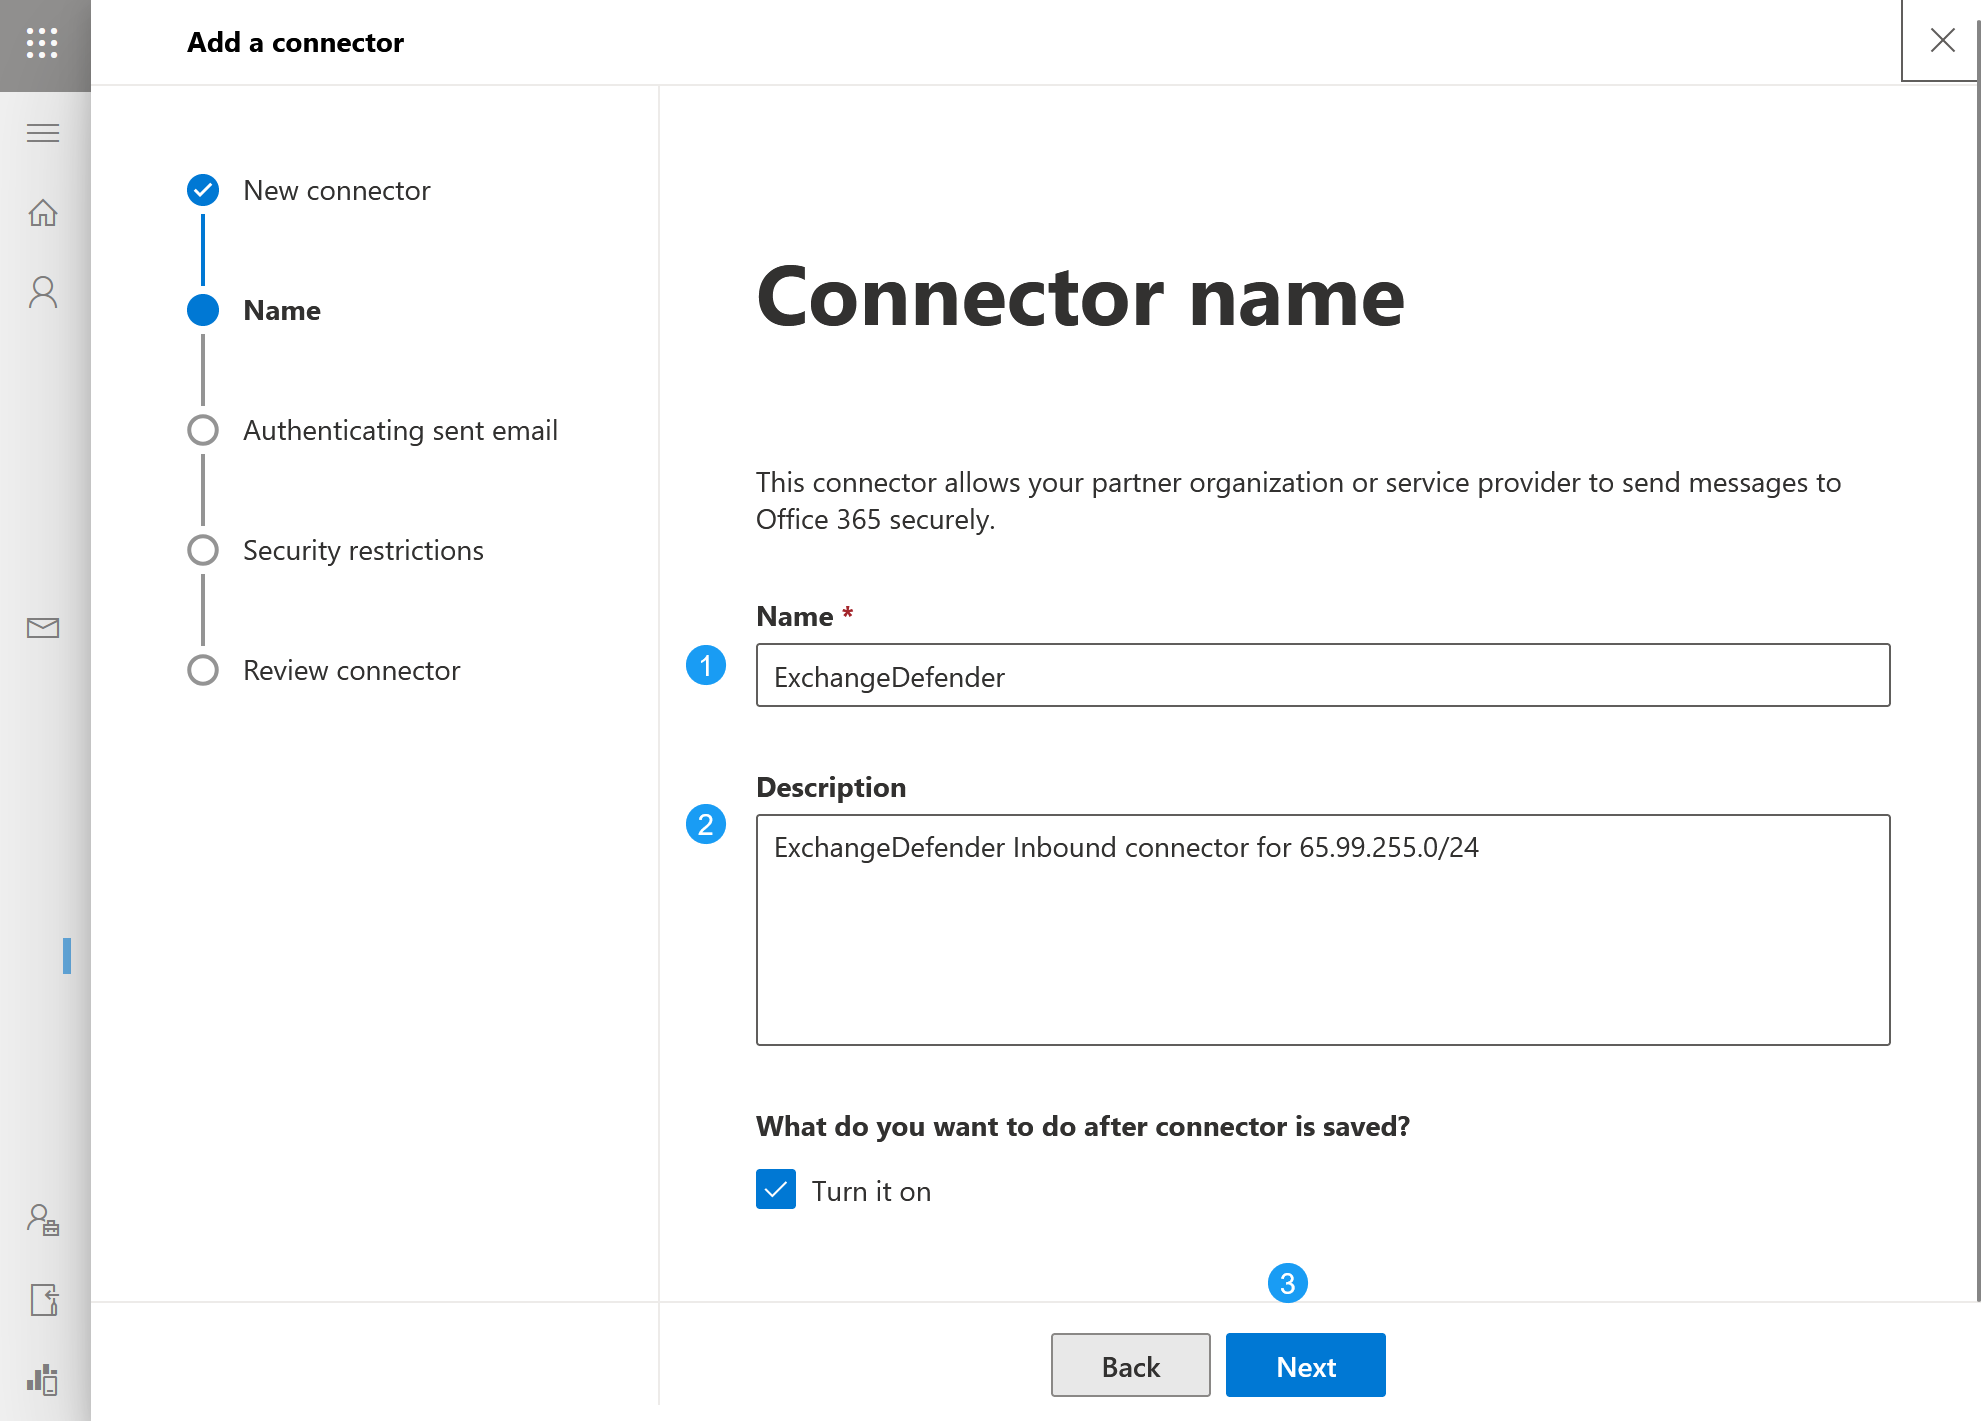
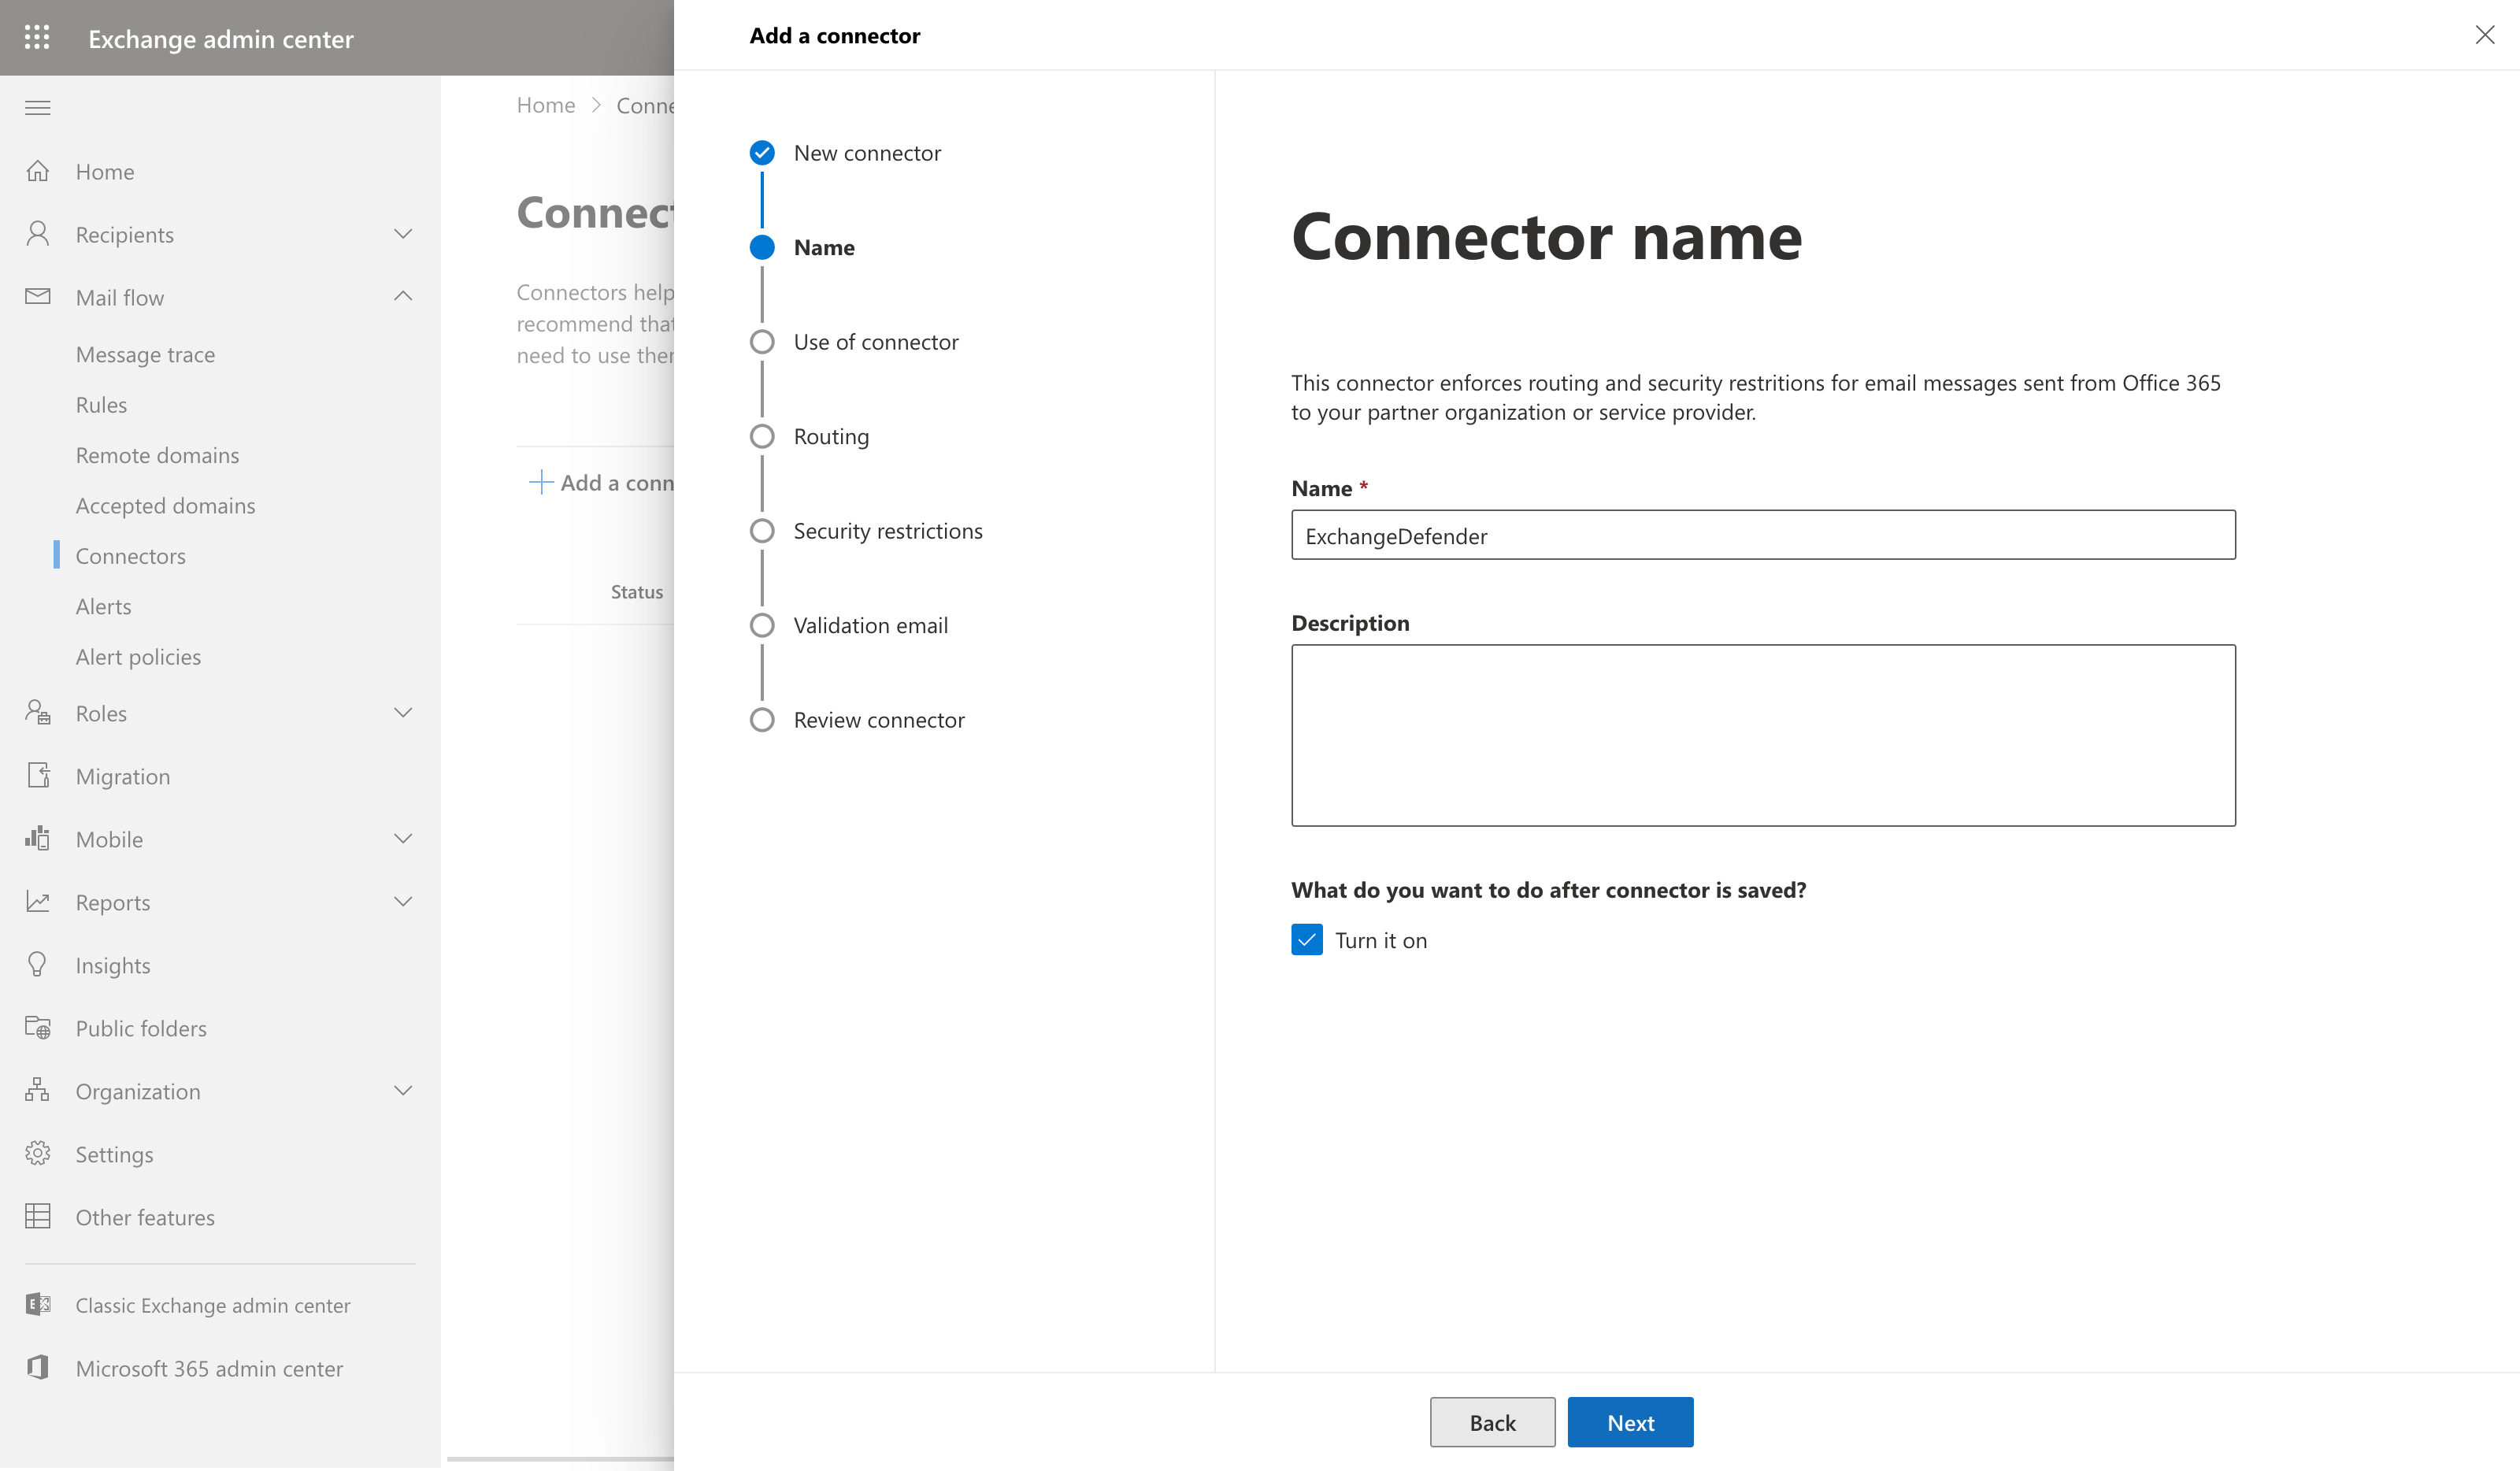
- Name and describe the ExchangeDefender SMTP connector so you can recognize it when managing your instance. If you are not using ExchangeDefender to the fullest you will likely have to create other connectors for other partner organizations, contact forms, IoT devices, printers, scanners, etc.
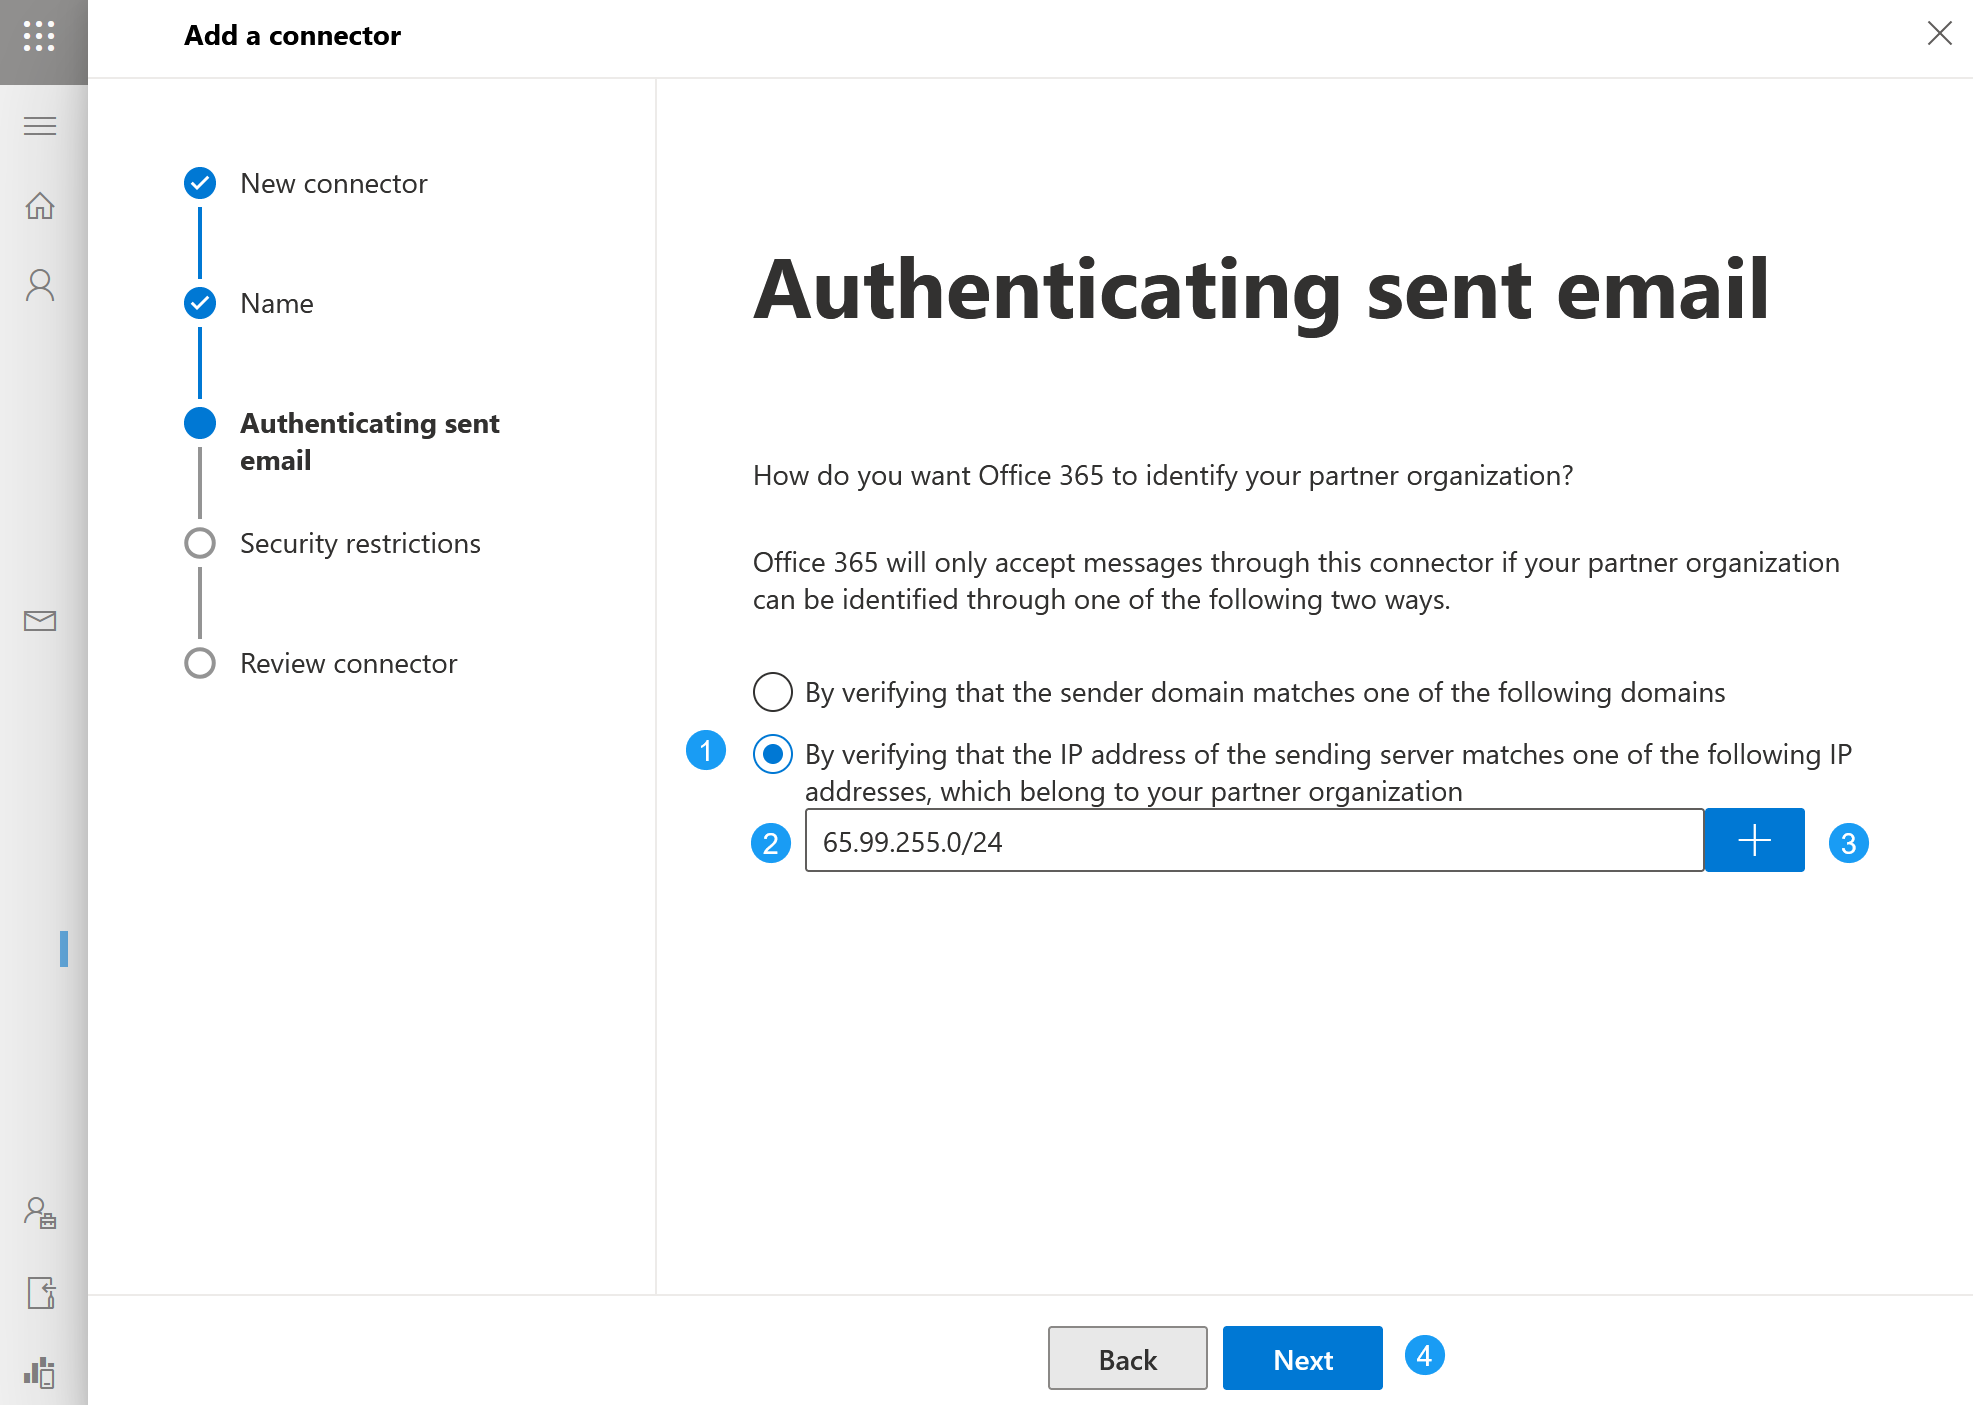
- Next we will program IP restrictions so your M365 tenant only accepts messages from ExchangeDefender's delivery range. Click on By verifying the IP address... and type in the IP range 65.99.255.0/24 in the input box. Finally click on the "+" and then click on Next. IMPORTANT bubble highlight div: "Make sure you click on the + button which will empty out the input box and place "65.99.255.0/24" directly underneath it with a Delete icon. If you do not click on the + button the IP range will not be added and this is the most common mistake admins make in this process.
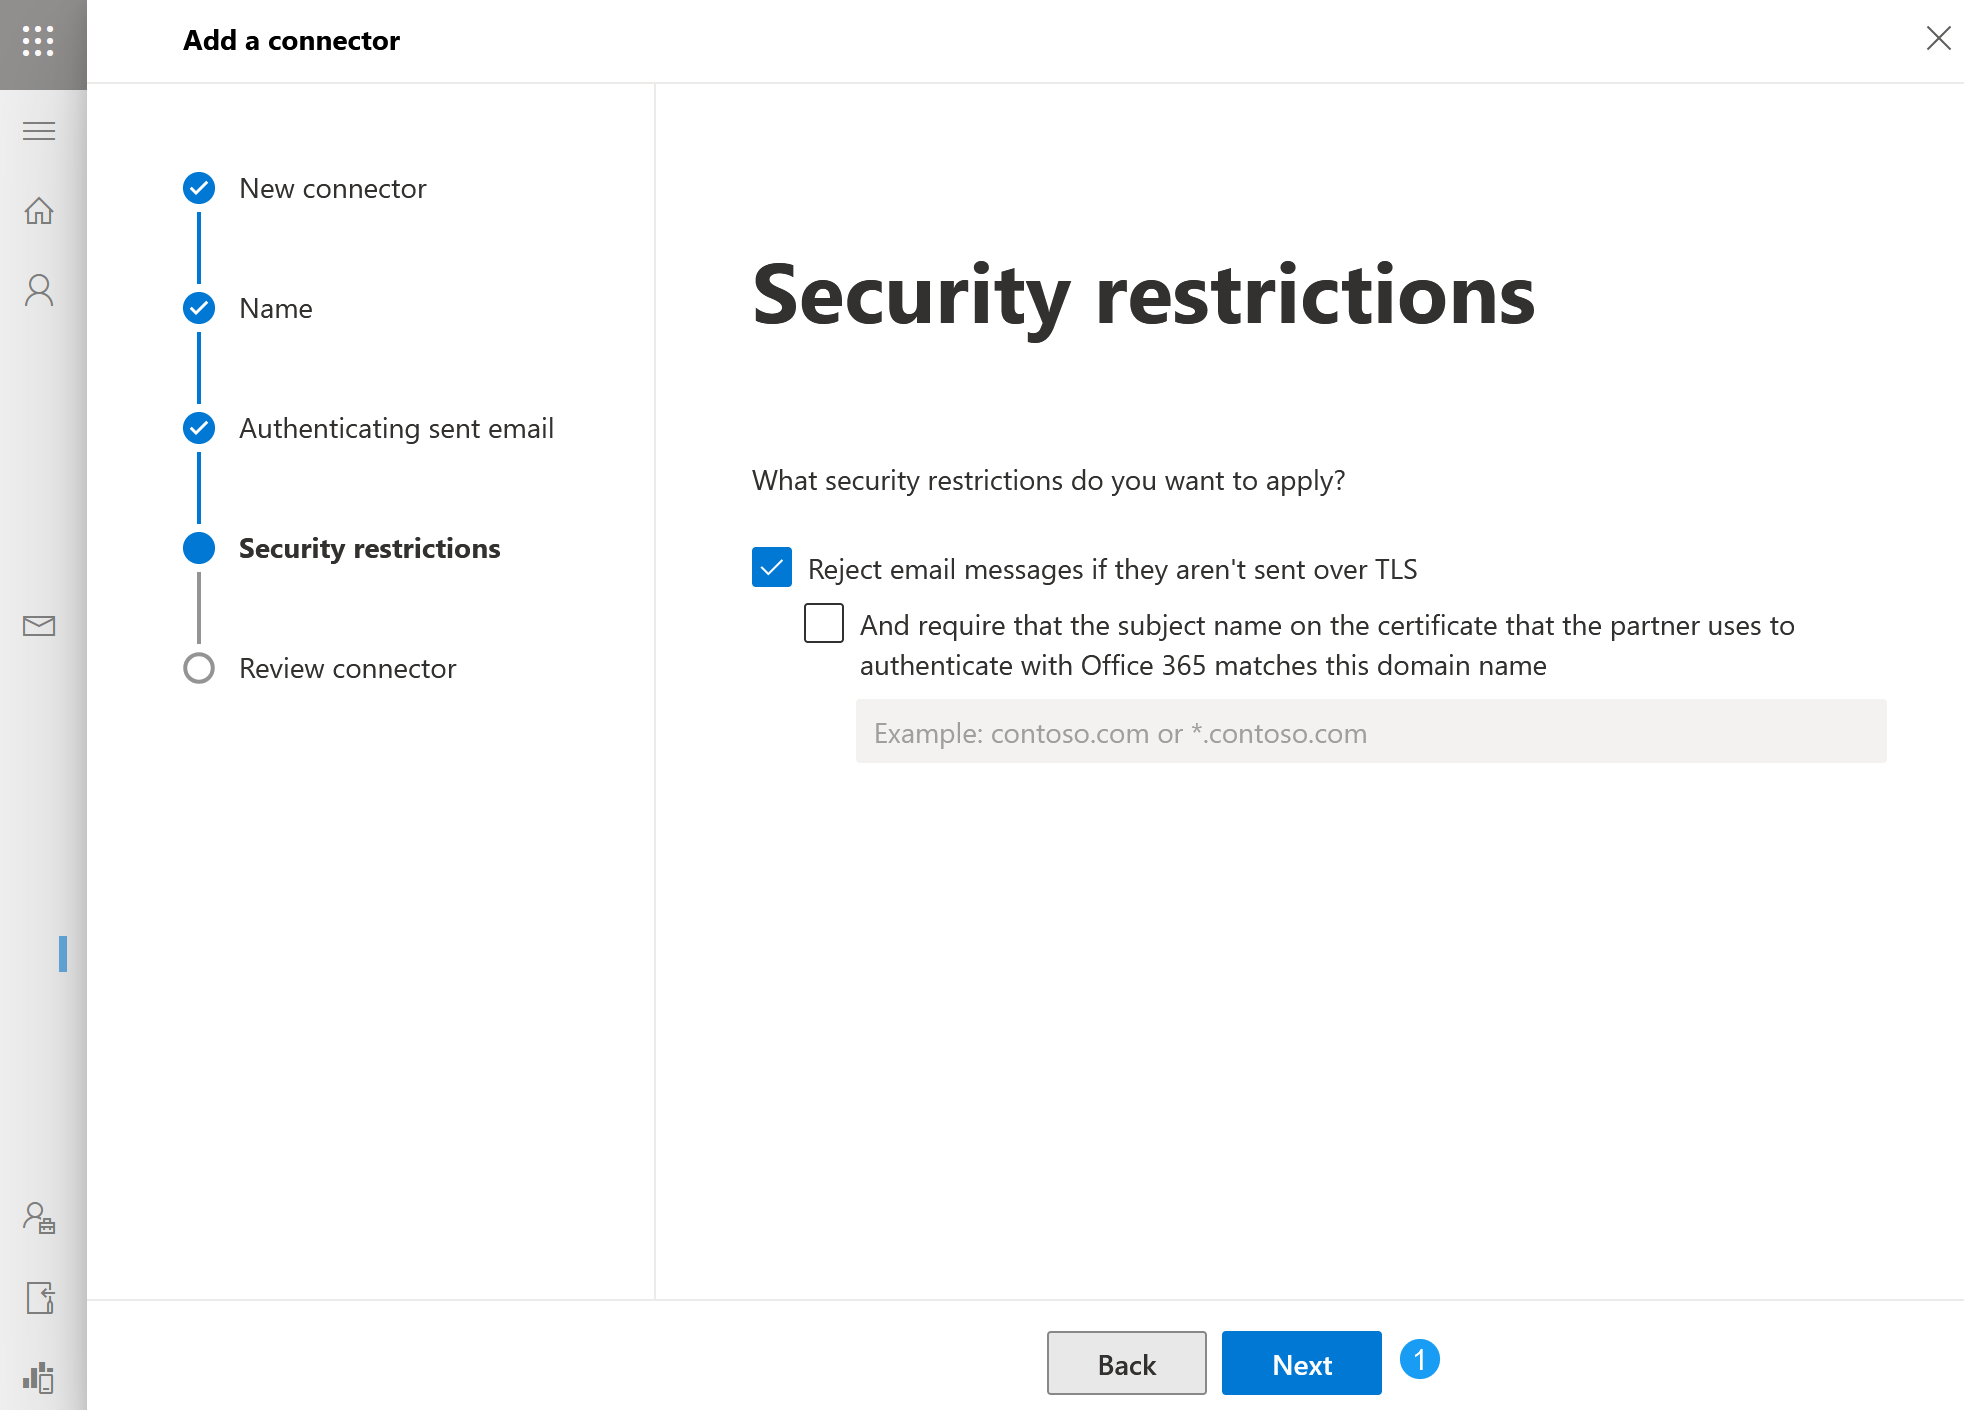
- ExchangeDefender relies on secure connections and encryption to keep your messages private so accept the defaults on this screen by clicking Next
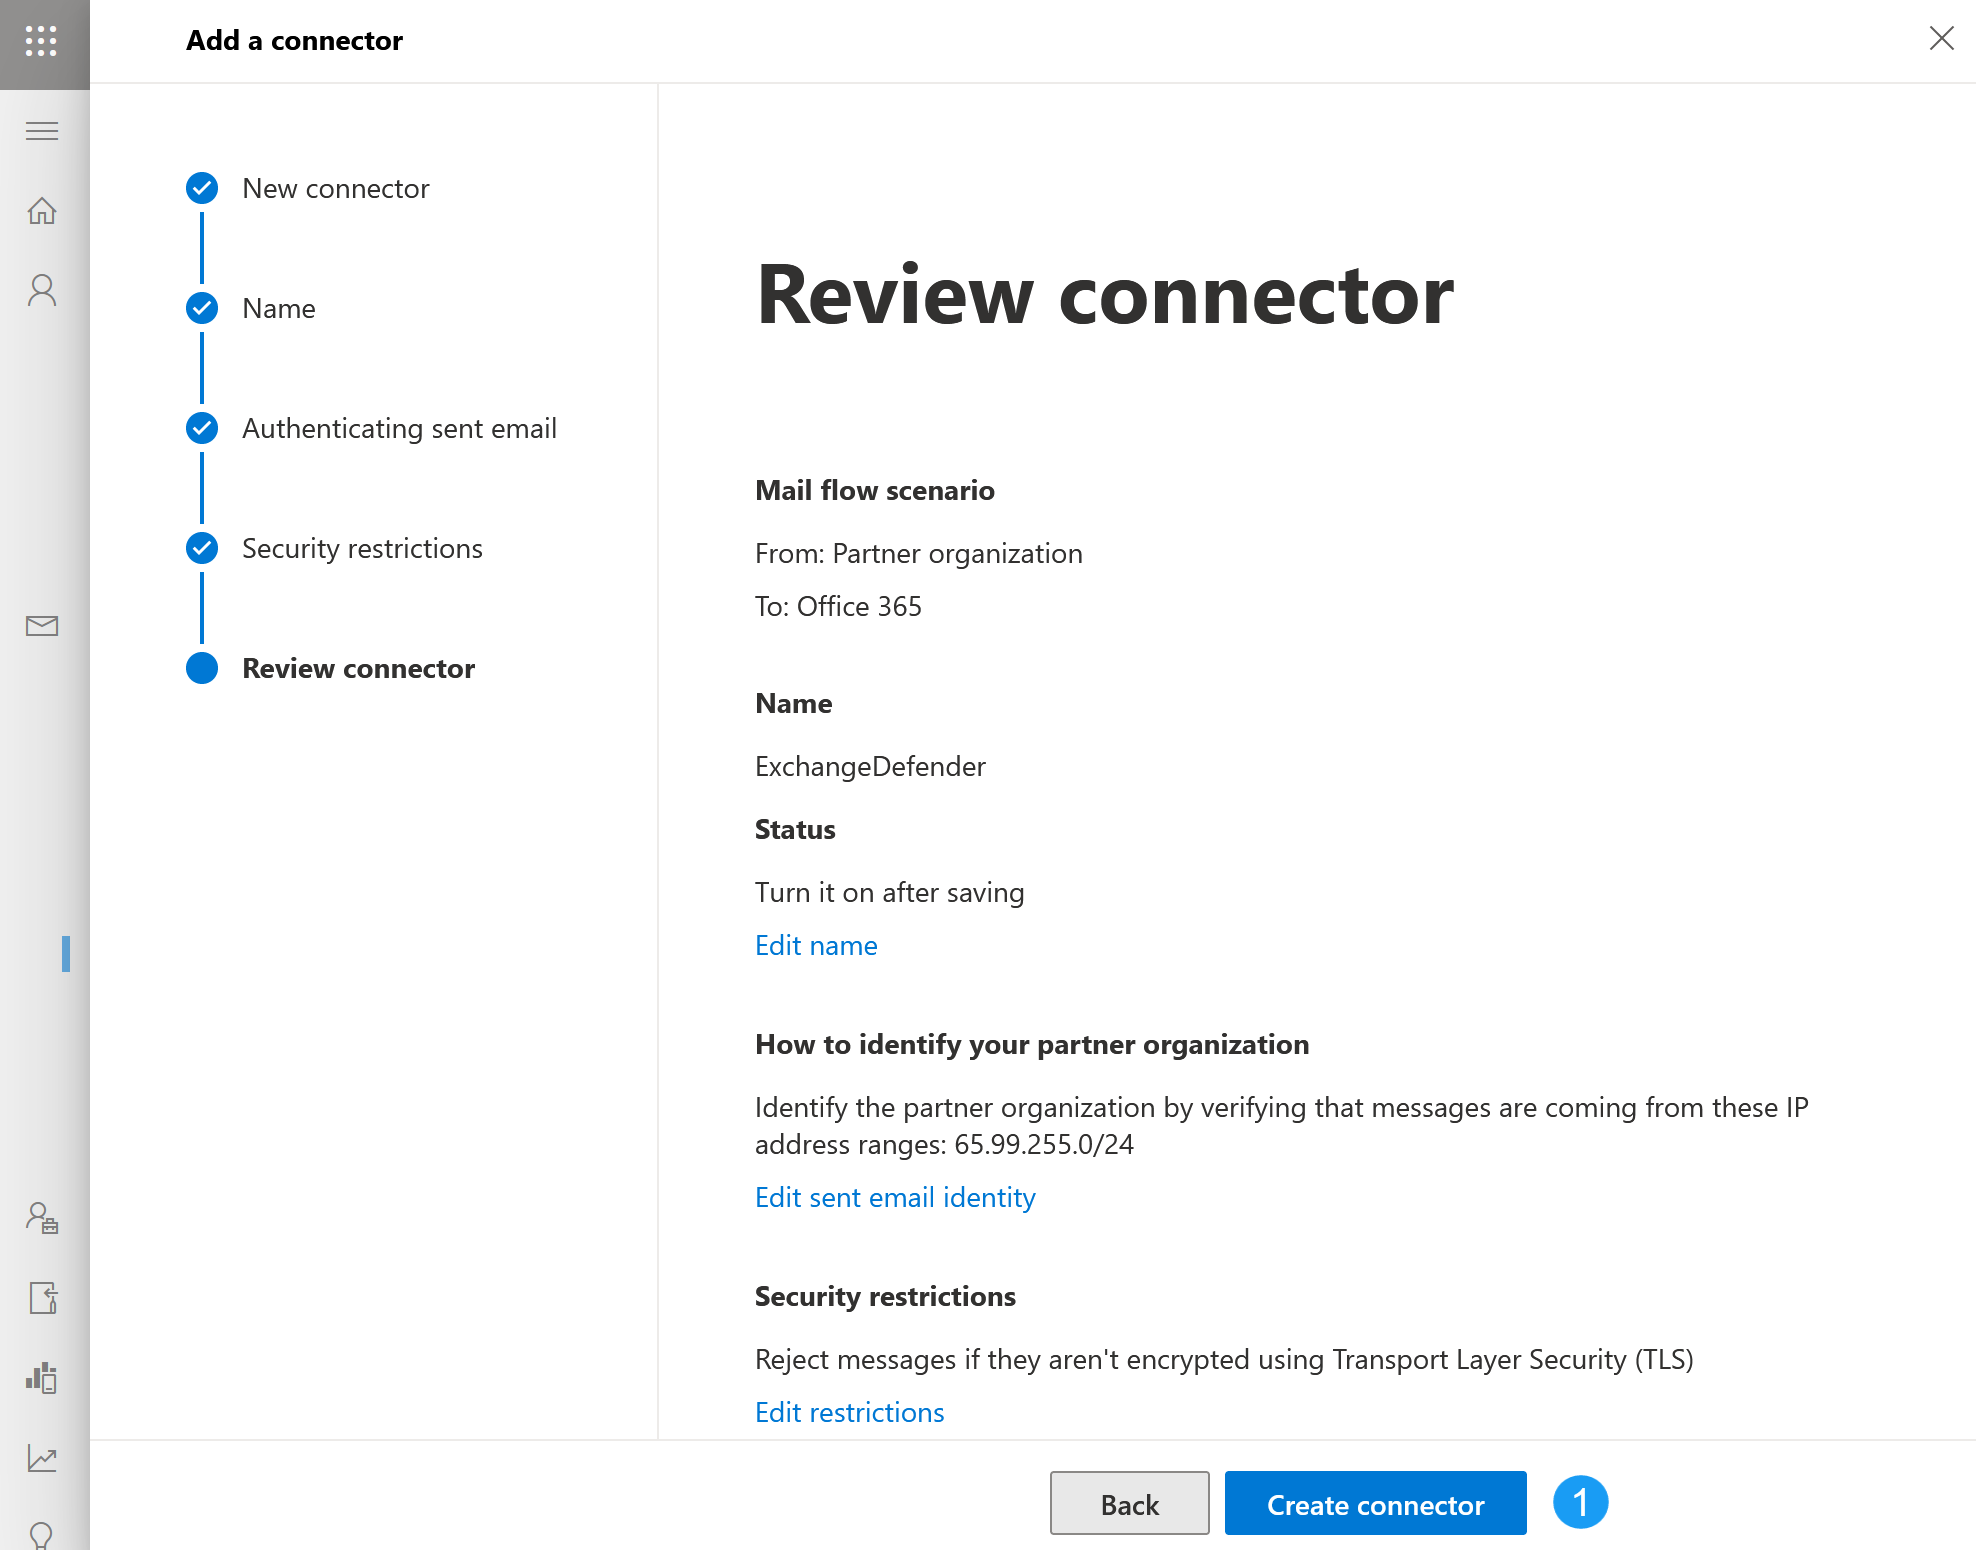
- Your review connector screen should look like this. Make sure you see 65.99.255.0/24 under the "How to identify your partner organization" section. If everything looks correct, click on Create connector and then click on Done
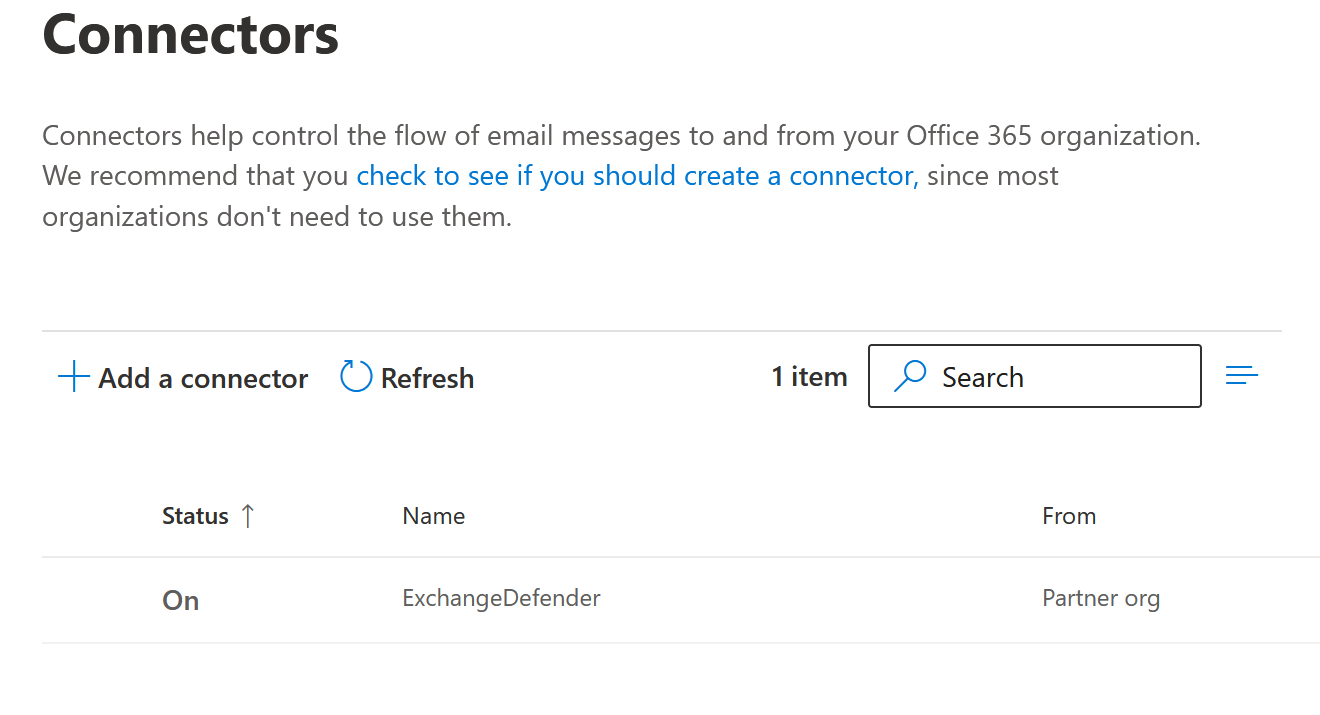
- You will be taken back to the list of your connectors and this portion of the setup is complete.
You can also create the ExchangeDefender SMTP connector using M365 PowerShell. Here is the command:
New-InboundConnector -Name "ExchangeDefender" -ConnectorType OnPremises -SenderIPAddresses 65.99.255.0/24 -RequireTls $true -CloudServicesMailEnabled $false -Enabled $true -RestrictDomainsToIPAddresses $true -Comment "ExchangeDefender Inbound connector for 65.99.255.0/24"
This SMTP connector will restrict access to incoming mail in your organization and only messages that get scanned by ExchangeDefender and relayed from our secure endpoints will be accepted. If you have other services requiring direct access to your M365 tentant (web site contact forms, printers, scanners, IoT devices, firewall notification scripts, etc) you will need to create a connector for each service. ExchangeDefender makes this simple using our IoT Connector SMTP Relay service.
Required for service
ExchangeDefender Outbound Connector
If your Organization hasn't updated their SPF for Office 365:
Your organization should have a SPF record for the domain(s) registered with Office 365. When implementing ExchangeDefender with Office 365, this record must be updated in the DNS zone for the relevant domain to include the following:
Remove: v=spf1 include:spf.protection.outlook.com –all
Replace with: v=spf1 include:proxy.exchangedefender.com -all
CONFIGURING OUTBOUND SMARTHOST CONNECTOR:
LOG IN to the Office 365 Administration Console.
Select the Admin | Exchange menu item. The Exchange Admin Center is displayed. Once displayed, in the menu on the left-hand side, navigate to Mail flow and then Connectors.
Click the ‘+’ button and you’ll be greeted with the following context menu. Once you've selected 'Office 365' and 'Partner Organization' click the 'Next' button.

ENTER the name of the connector (We suggest using ExchangeDefender).
CLICK check box for “Turn it On”. Click NEXT -
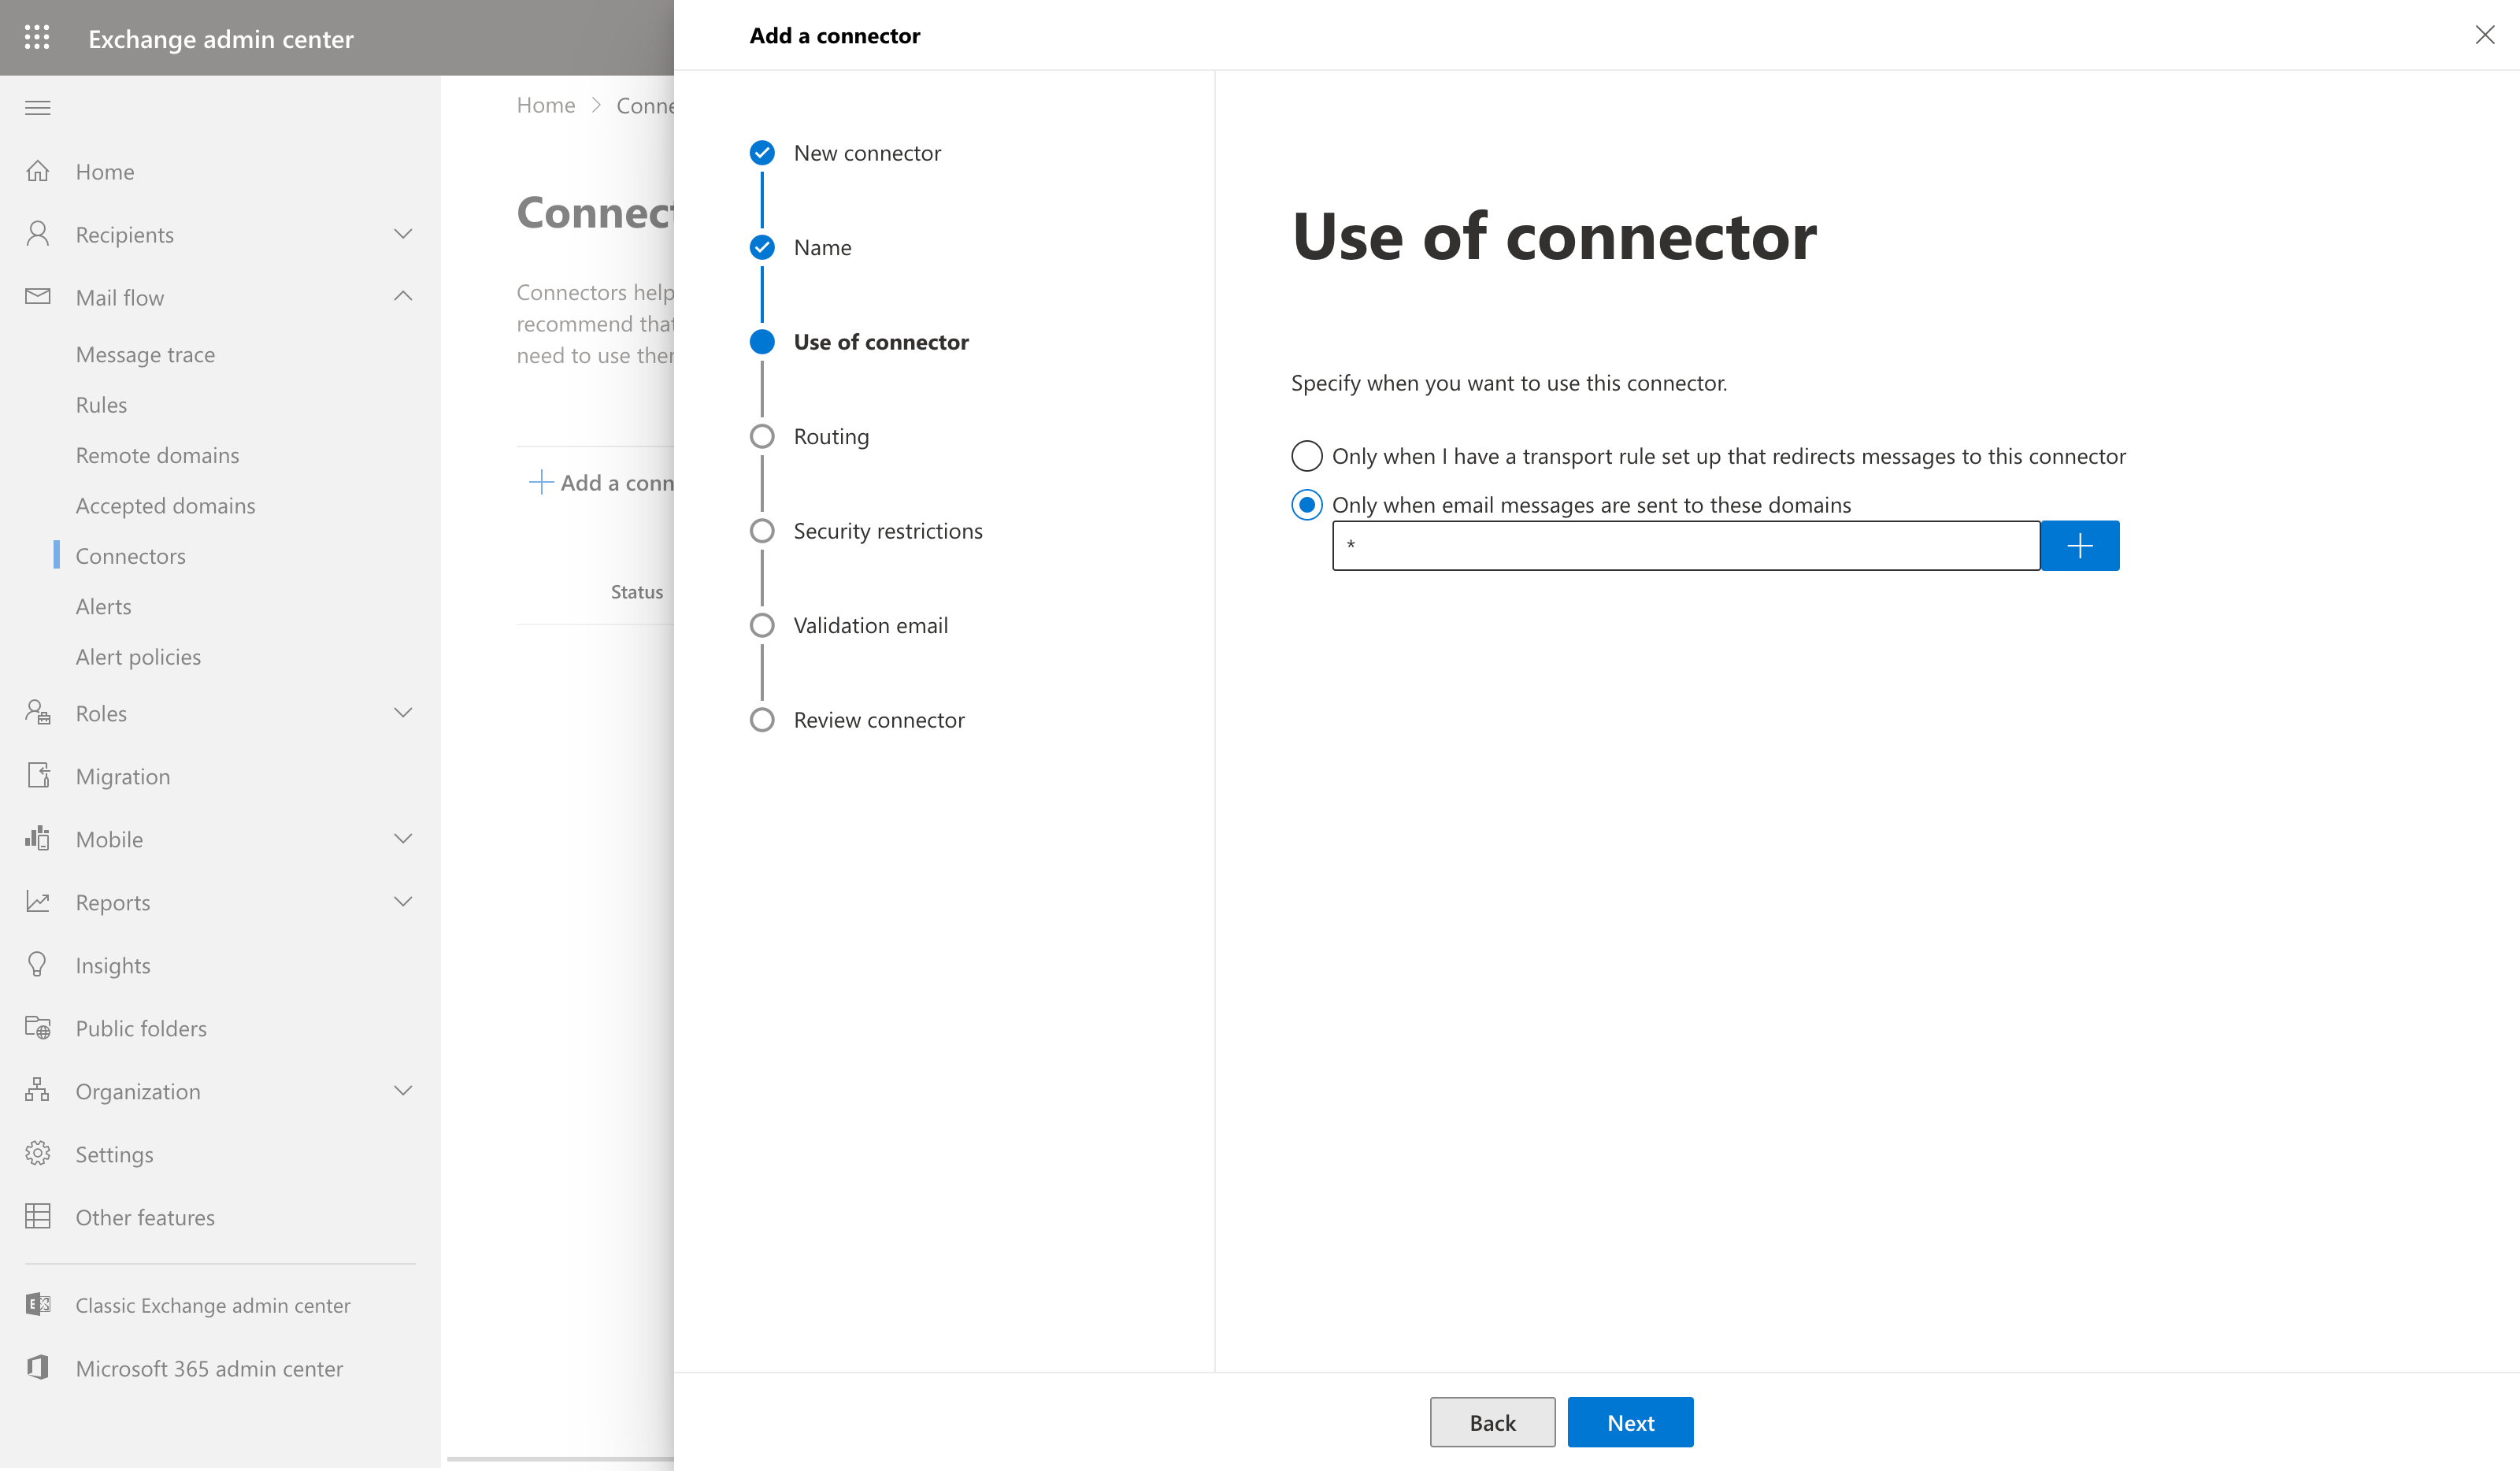
Select the option for 'Only when email messages are sent to these domains' and click the '+' button to add the domains
Put * in the domain name field and hit the 'Ok' button.
SELECT 'Route email through these smart hosts' and then hit the '+' button.

Add a smart host. Add 'outbound.exchangedefender.com' as you see it below.

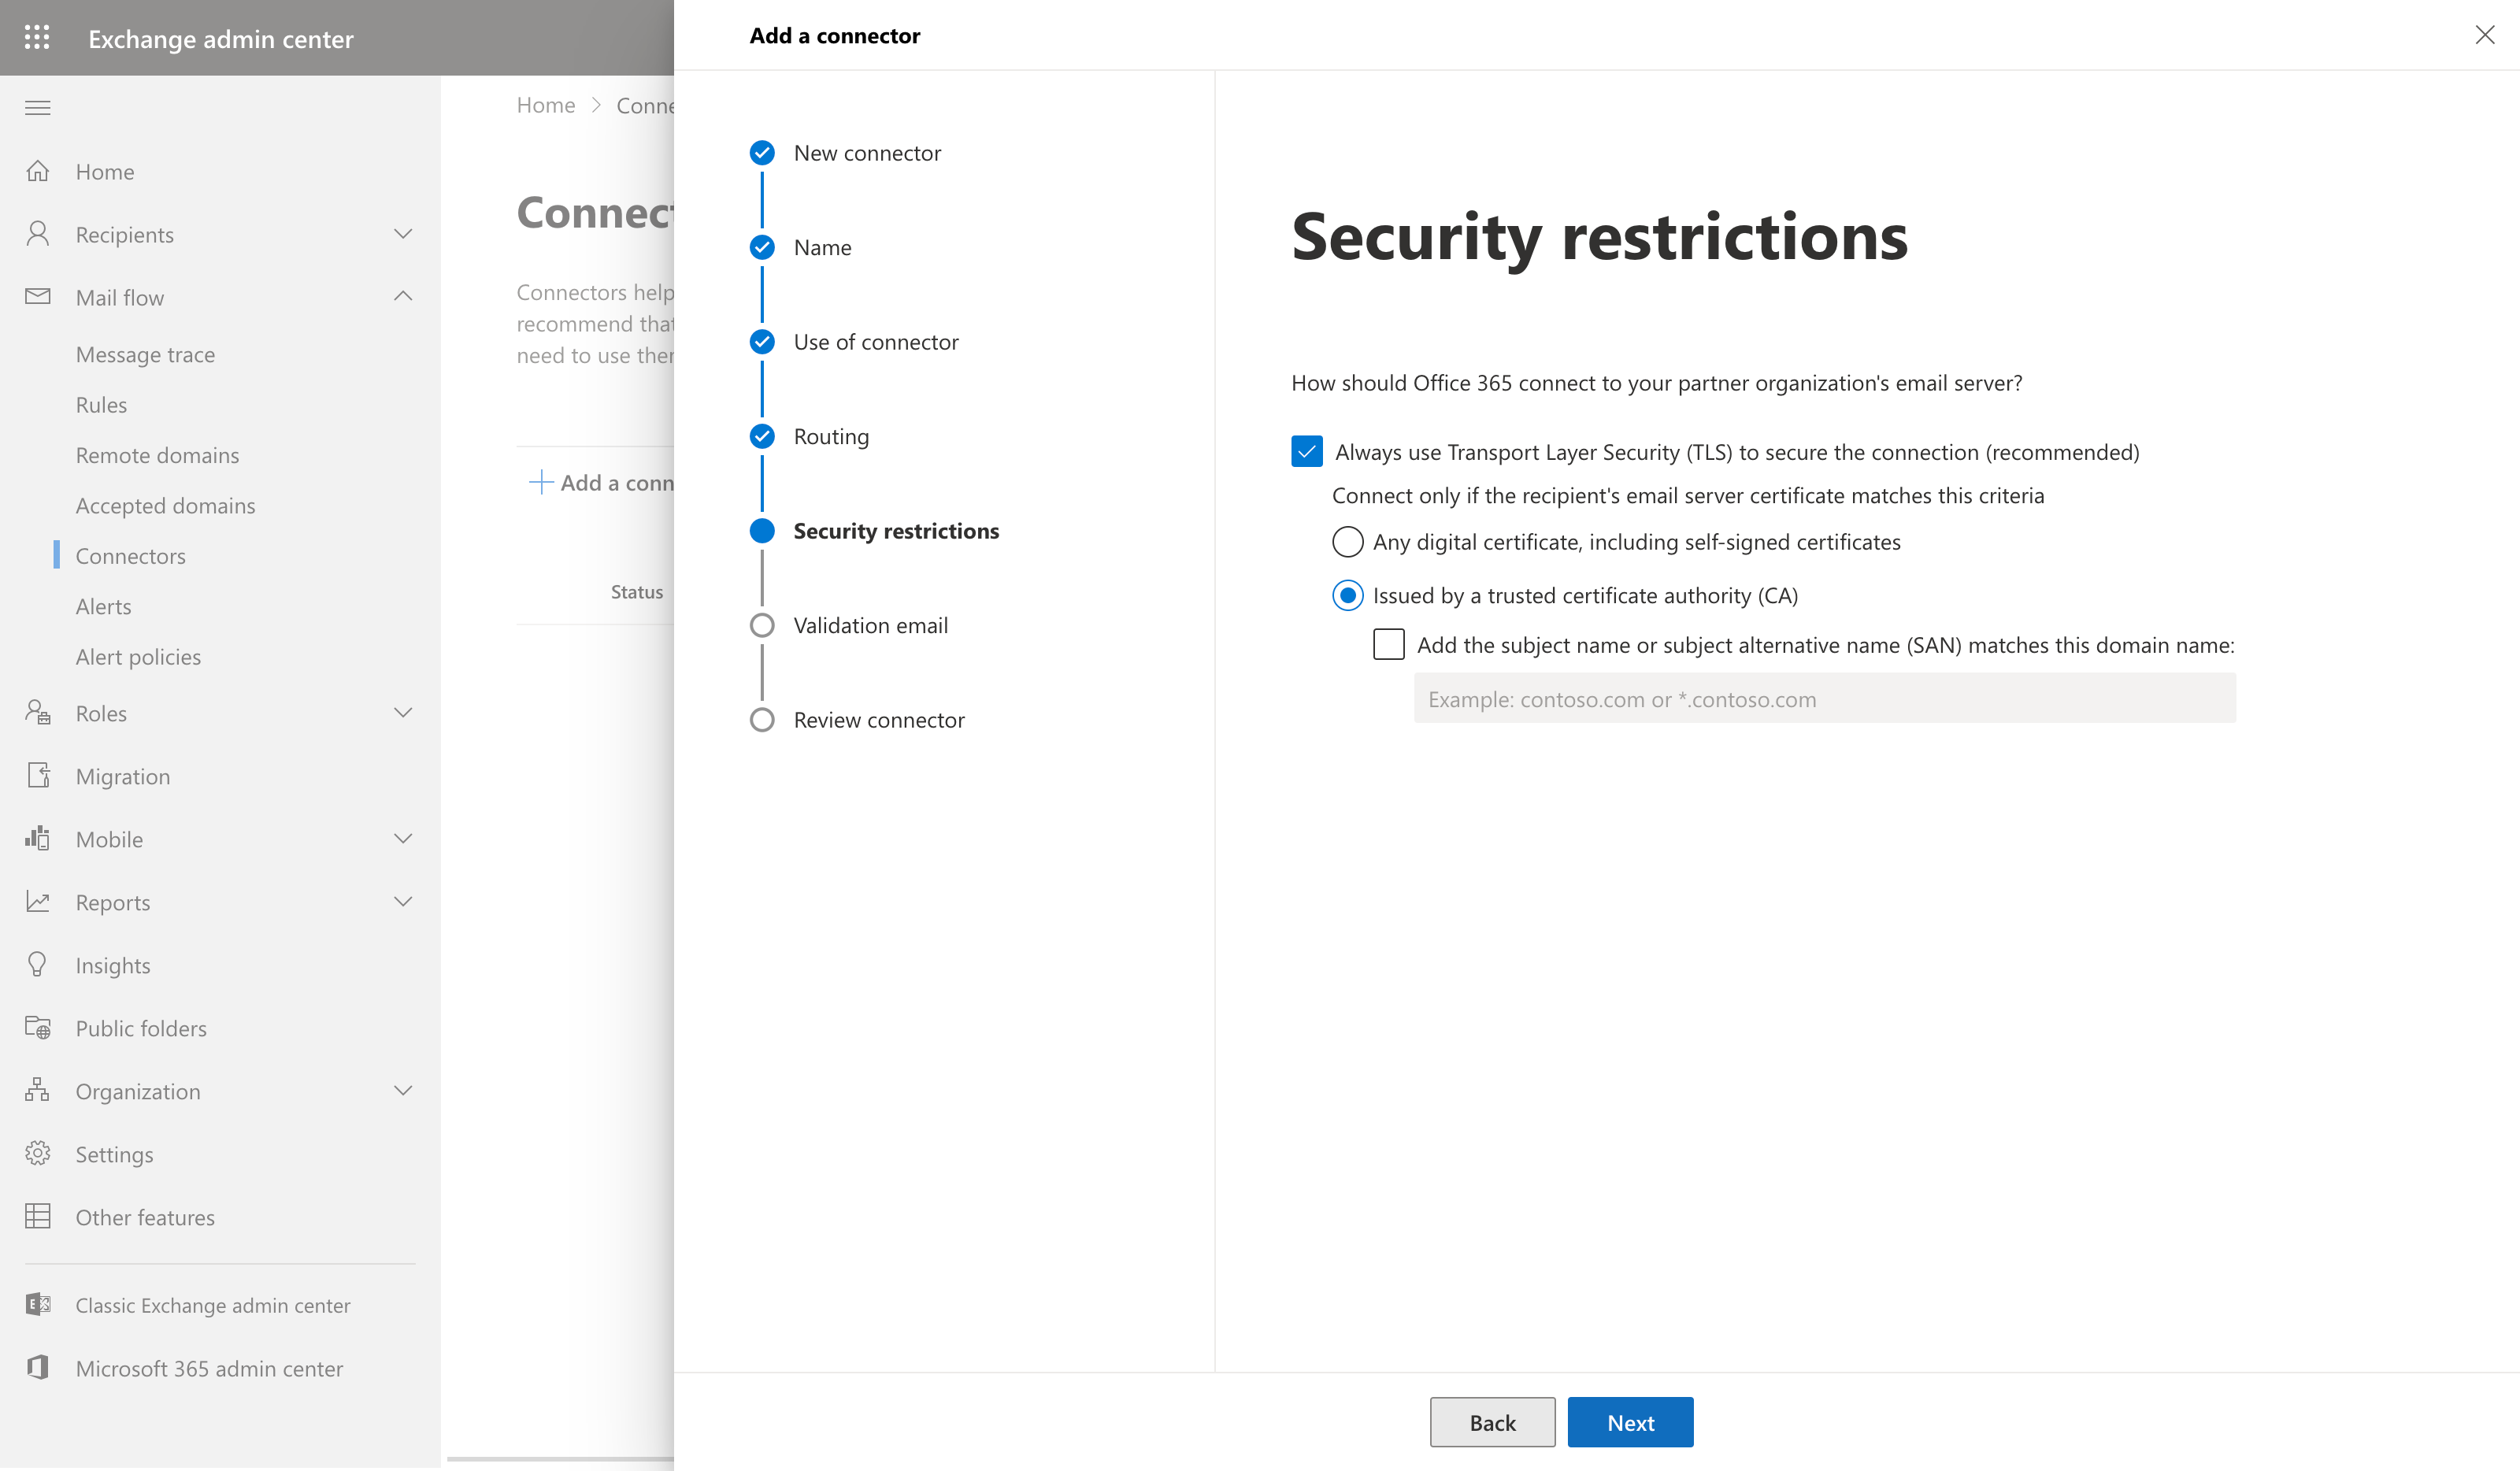
Once you've entered the smart host hit the 'Save' button. From there you'll be taken to the TLS screen. Keep all options default as shown in the screenshot below.
Validate your configuration by letting O365 send a test email. Enter in any email address of a recipient outside of your organization. Click the + then click VALIDATE.
Required for service
M365 Tenant Anti-phishing and Anti-spam Settings
ExchangeDefender protects you from SPAM and Phishing threats. To avoid M365 falsely identifying messages as fraud, follow these steps to add ExchangeDefender to tenant allow policies:
Manage Anti-Phishing Rules
- Login to Microsoft 365 Defender Security Center at https://security.microsoft.com
- Navigate to Email & Collaboration > Policies & Rules > Threat Policies
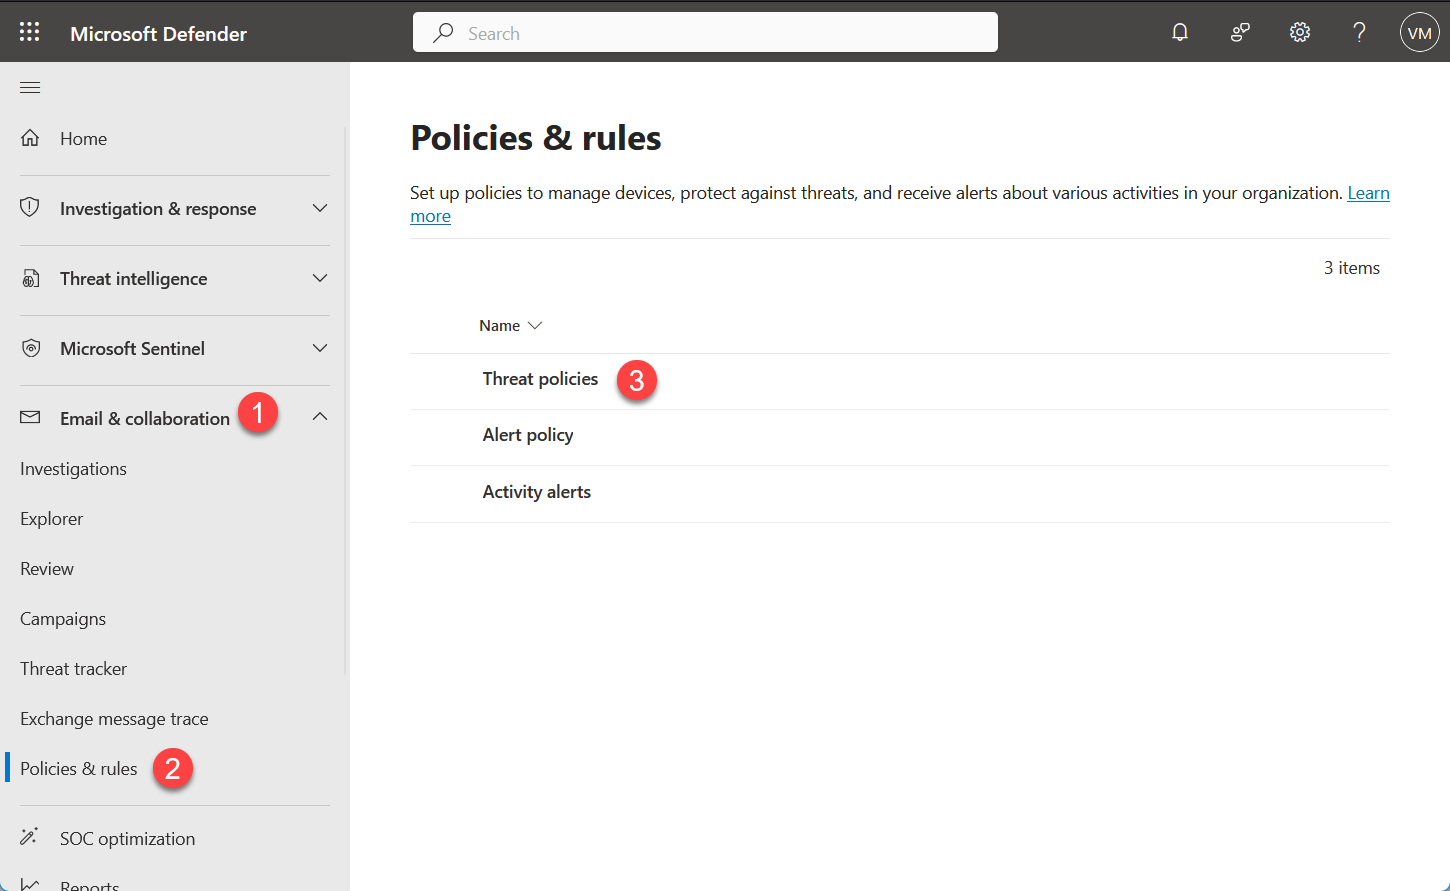
- Under Microsoft Defender Policies we will be making changes to Anti-Phishing policies and Tenant Allow/Block Lists under Rules.

Policies & rules
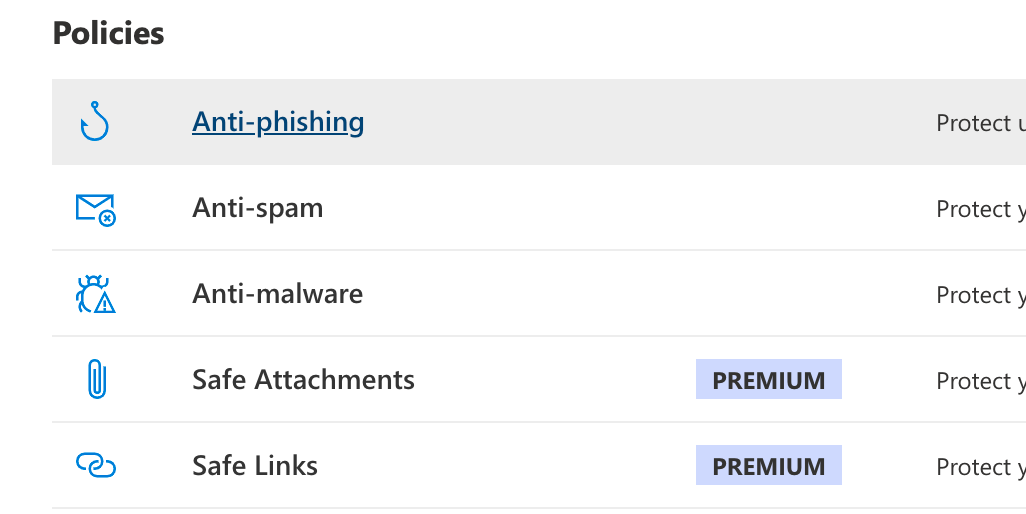
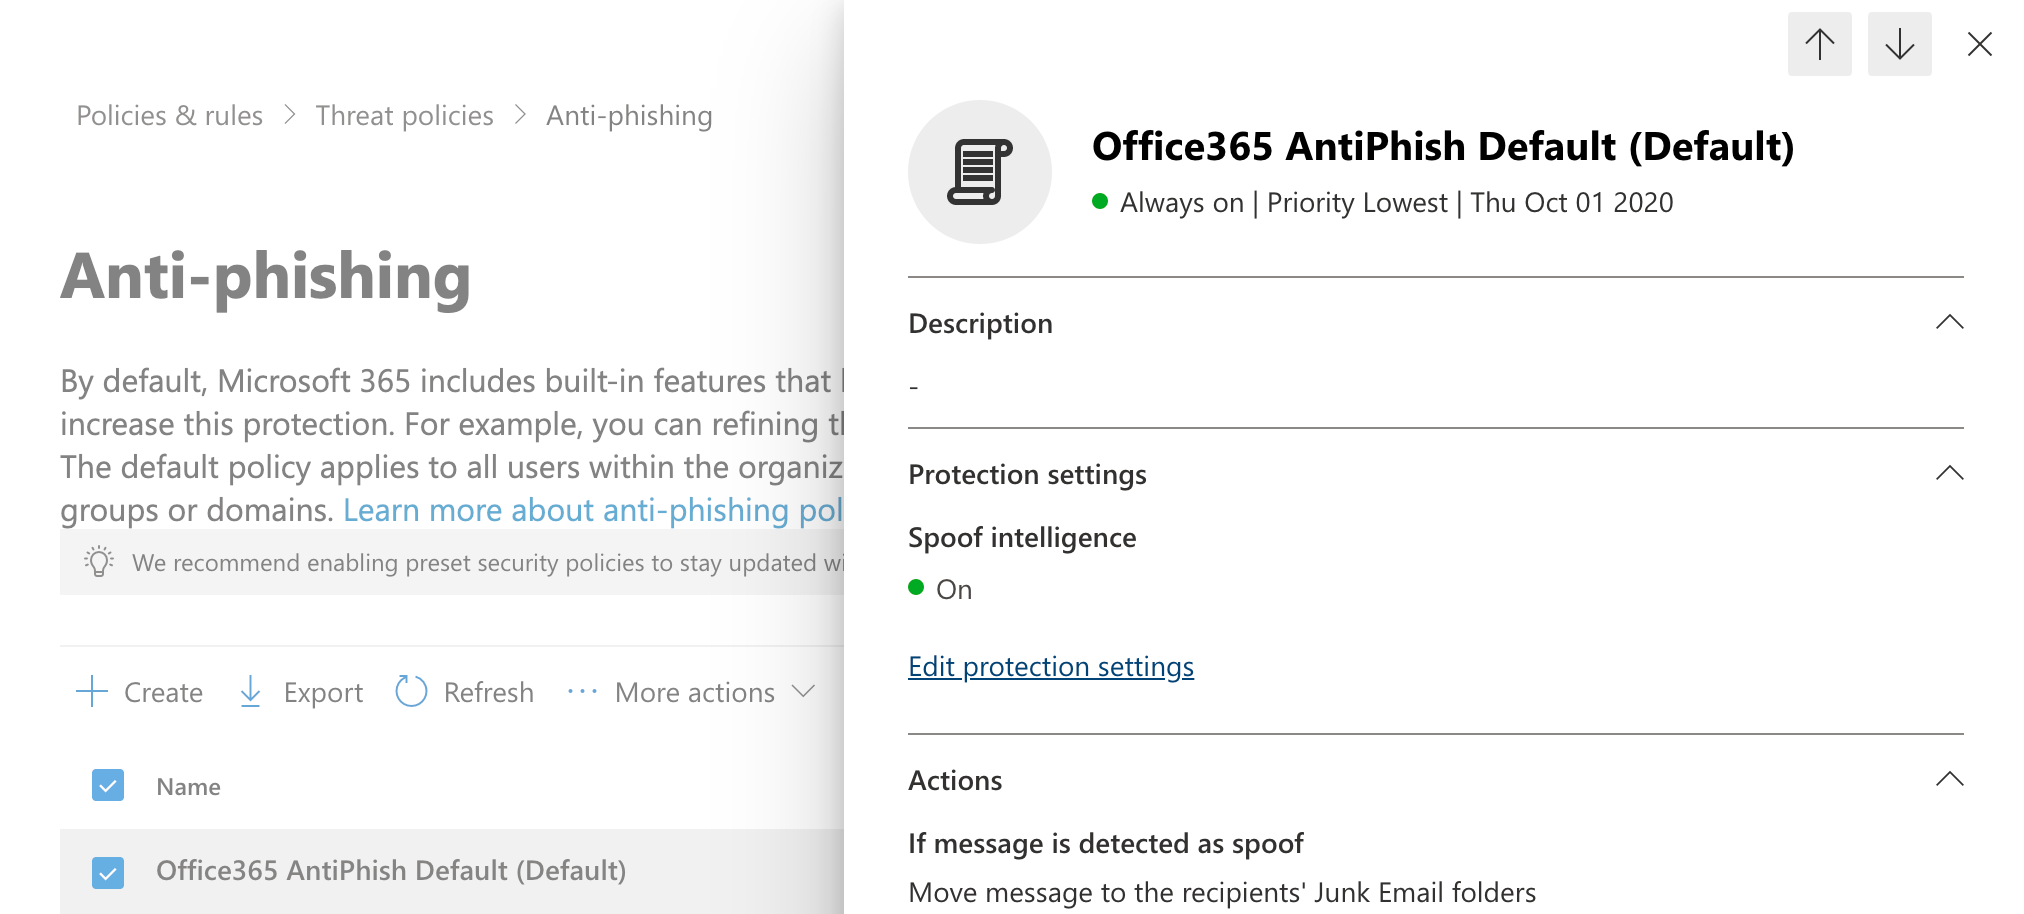
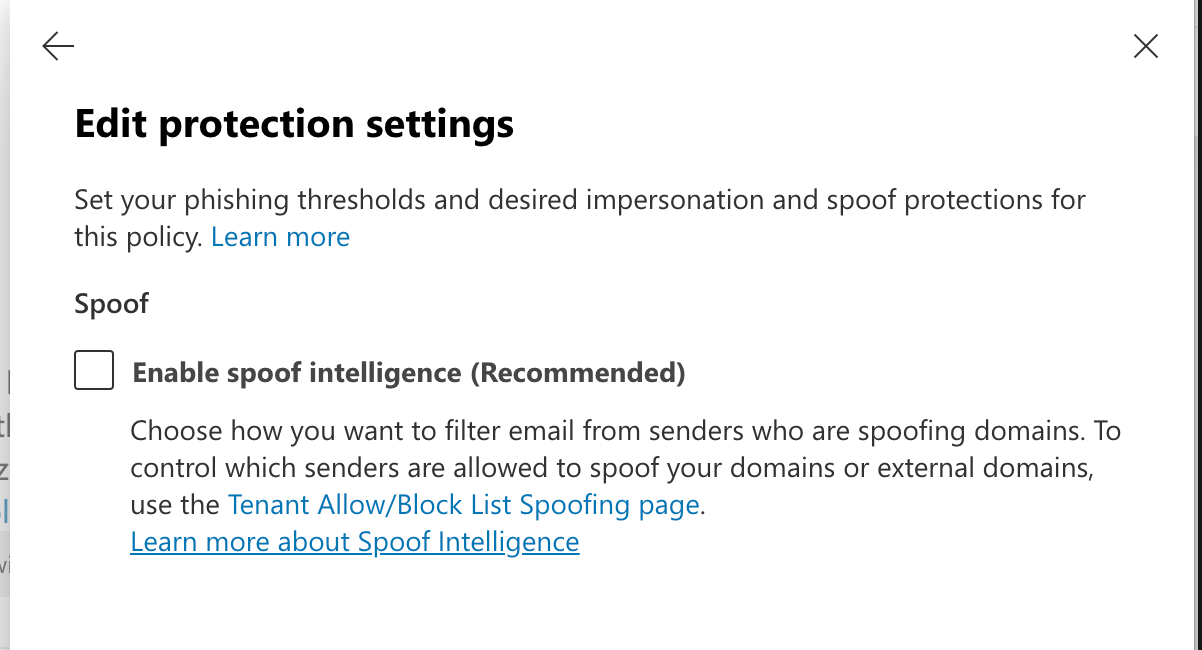
Select Anti-Phishing under Policies. You will be presented with a list of policies, select "Office365 AntiPhish Default (Default)" or your default security policy. Expand Protection Settings. Confirm that "[ ] Enable spoof intelligence (Recommended)" setting is clear (unchecked) and click on Save.
Tenant Allow/Block Lists
Select Tenant Allow/Block Lists under Rules (Under Email & Collaboration > Policies & rules > Rules section of Microsoft Defender). Click on Spoofing and +Add
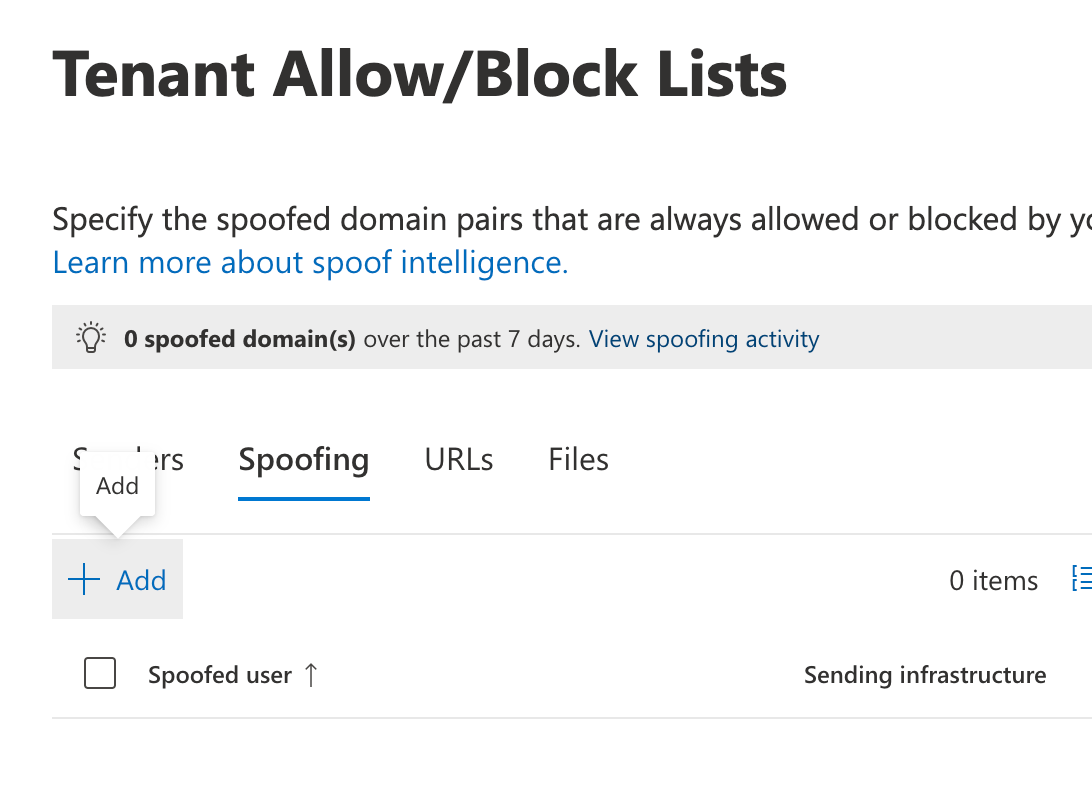
Below is the content to paste into the domain pair list
*, 206.125.40.0/24
Select Spoof type: External and Action: Allow.
Paste the content below into the domain pairs text box and click on Add. Confirm that the new tenant Spoofing allow list matches the display below.

Disable M365 False Phishing Alerts
"Subject: Informational-severity alert: Phish delivered due to an IP allow policy"
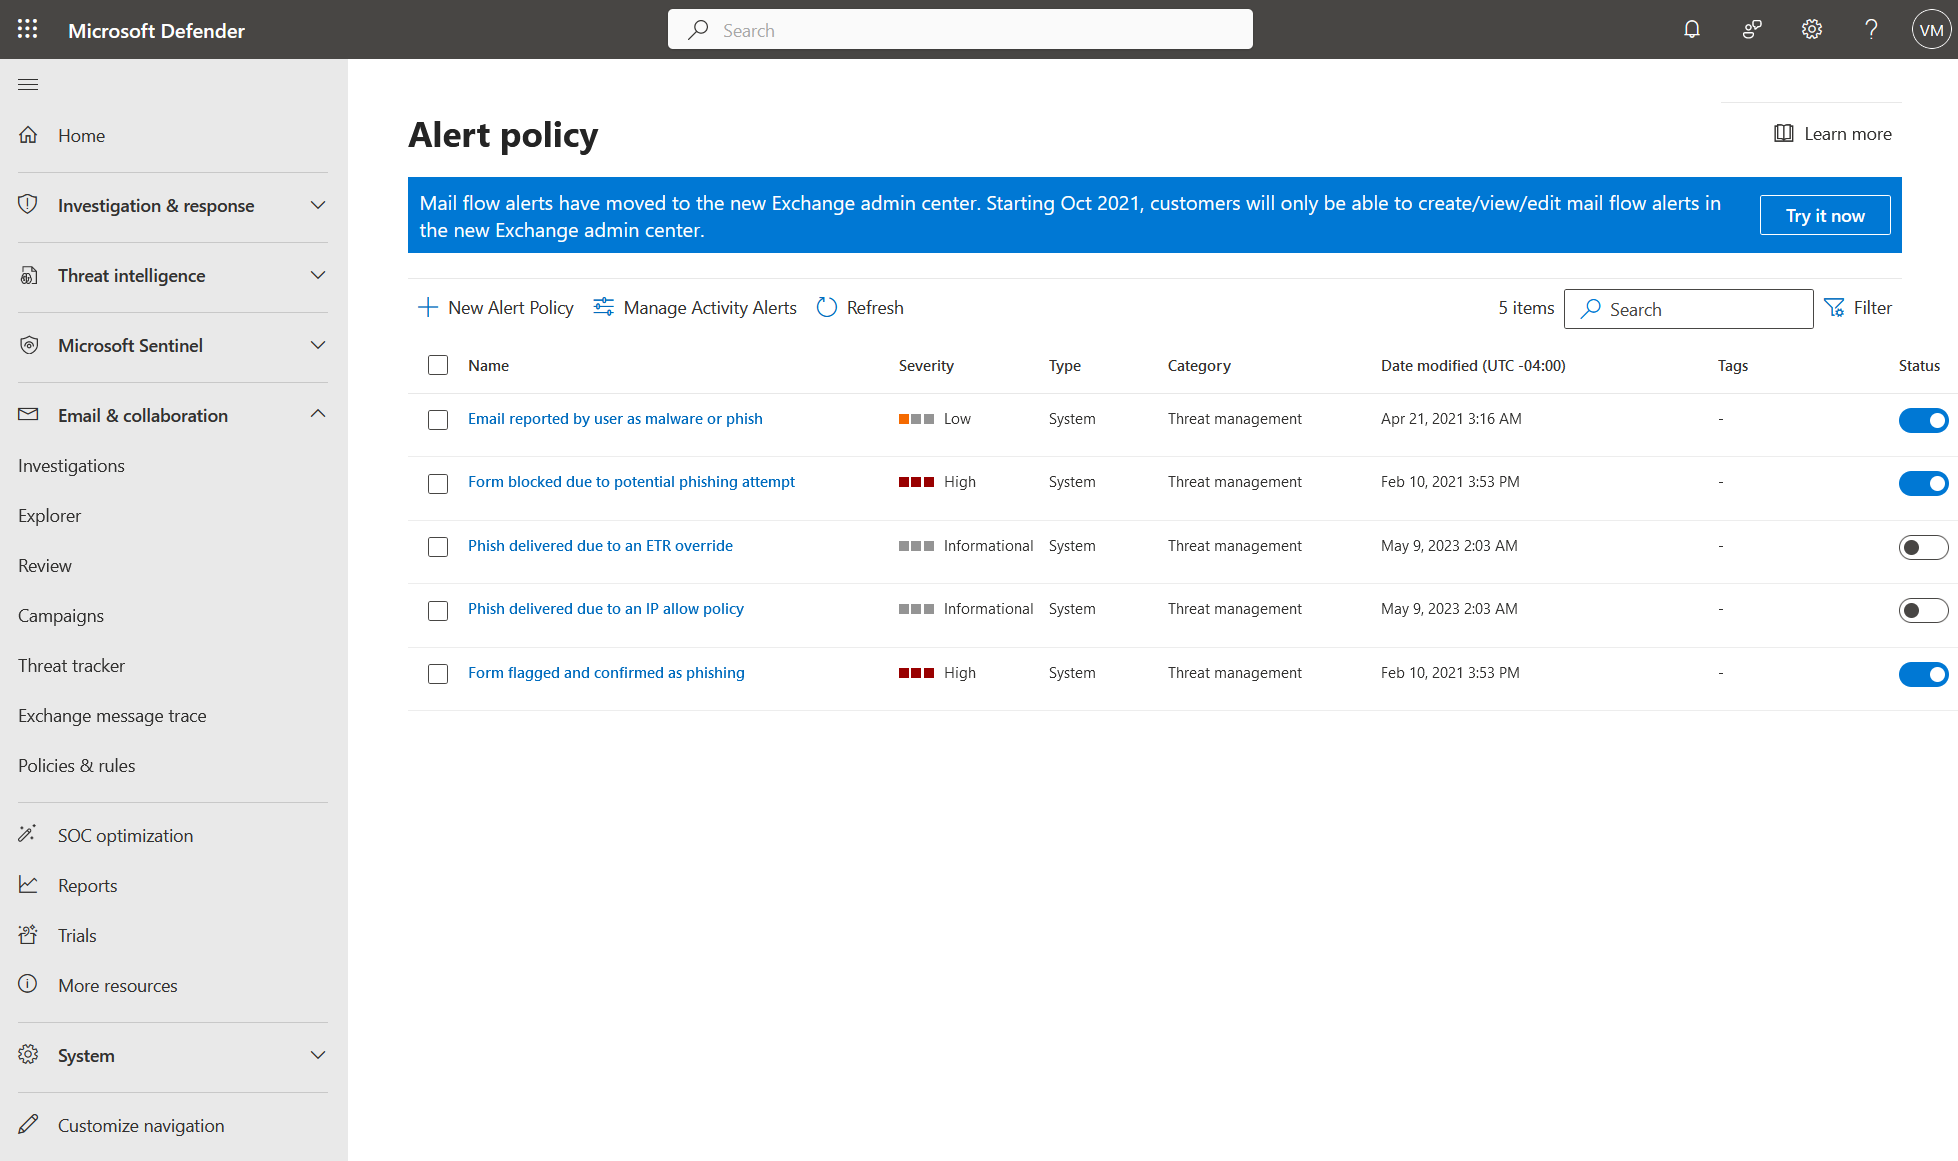
Go to security.microsoft.com and select Policies & Rules on the left. Select Alert Policy and make sure the following alert policies are deactivated (not blue) as in the screenshot below: "Phish delivered due to an ETR override" and "Phish delivered due to an IP allow policy"
Microsoft365 and ExchangeDefender Outbound Limitation
ExchangeDefender outbound network (outbound.exchangedefender.com) only relays email on behalf of our clients domains. Security and general Internet protocols prohibit us from sending email on behalf of other networks. As a security company it's our responsibility to prohibit spoofed or forged messages, for example someone using your organization to send emails as gmail.com or to launch an attack as a null sender.
Send legitimate M365 Out of Office (OOF) Responses
If you need to make sure Out of Office responses are sent out no matter what, here is the general process to follow at https://admin.exchange.microsoft.com
Step 1: Create new Exchange Connector
This step will create a Microsoft M365 connector that will route all messages from your M365 tenant directly to the senders MX record (bypassing ExchangeDefender and assuring the OOF attempt is made)
Exchange > Mail flow > Connectors
+ Add a connector
+ Connection from: Office365
+ Connection to: Partner organization
+ Name:
+ What do you want to do after connector is saved? [CHECK] Turn it on
+ Use of connector: Only when I have a transport rule set up that redirects messages to this connector Next>
+ Routing: Use the MX record associated with the partner's domain
+ Security restrictions (accept defaults)
+ Validation Email / Review Connector Next/Save.
Step 2: Create a new Mail flow Rule
This step will create a rule that forwards OOF messages to the Connector we made in step 1.
Exchange > Mail flow > Rules
+ Add a rule
+ Name: "Send Automatic Replies to connector Automatic Replies"
+ Apply this rule if: "The message properties"
+ The message type is Select one: "Automatic Reply"
+ Do the following: Redirect the message to: "the following connector"
+ Select "Automatic Replies (Out of Office) Only"
+ Click Next>
Accept defaults (Enforce)
Step 3: Publish new DMARC
Make sure you configure DKIM signing to include Microsoft's signature, the instructions are here.
Next update the SPF record to include M365 connector, it should look like this:
"v=spf1 include:proxy.exchangedefender.com include:spf.protection.outlook.com -all"
Step 4: Make sure everything works
Validate your connectors, rules, SPF records, DKIM records, and confirm everything is enabled and enforced. One area our clients often overlook is enabling the Mail Flow > Rules: Confirm that the "Send Automatic Replies to connector Automatic Replies" - confirm that the rule is enabled.
Sending messages from external domains
To relay messages from external domains please see our ExchangeDefender IoT Connector feature.