Shockey Monkey–SOAP Callback
This week our development team here at Shockey Monkey has finished the SOAP Callback framework and has published this new release to all portals. This new framework enables you to configure automatic code level responses when certain conditions are triggered. Current the only supported triggered events are related to tickets (create, update, close). Over the course of this year we will expand the available list of triggerable events as demand for them increases.
The most elegant design feature of this entire framework is the dynamic interface structure that allows virtually any SOAP interface to communicate with our software. Let me briefly walk you through the process for configuring the callback mechanism.
Settings -> Callback
The first time you visit this page, it will seem fairly empty but these two fields you should notice at the top. Simply provide the remote SOAP WSDL location and press “Validate”.
Now, the system will examine the URL and fetch any valid methods that exist inside of the requested module. You should notice the section below; it will become populated with new fields.
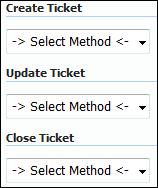
You should now see that you have three sections.
One for (Create Ticket, Update Ticket, and Close Ticket).Select a method from the dropdown list. You will notice these are all valid methods from the request API that we defined above in the previous step.
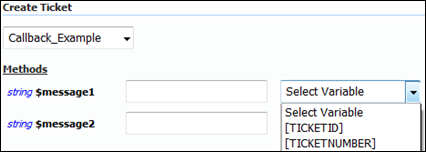
Once you have selected a method from the dropdown list, you will notice additional (parameter) fields. These fields are loaded dynamically depending on the parameters available in the provided SOAP API.
Note: One thing to keep in mind is complex types. If your method requires complex parameter types such as (arrays, objects, etc.) they will not be supported at this time. Basic types like (strings and integers), should be used mostly for parameter types.
The text box next to each listed textbox is where you will enter the desired value for this parameter. If you would like your method to use TICKET variables (“which is most likely”), they are provided in the dropdown menu to the right of the text field. Click the list and select the desired variable and it will prefill that variable into the text field to the left.
Also keep in mind each trigger is optional. You don’t have to assign a method for every section, only the ones you want to use. After you have finished assigning each of your methods and their corresponding parameters, click “Save”.
That’s it, callbacks are now enabled and you should begin to see the results!
Hank Newman
VP Development, ExchangeDefender
hank@ownwebnow.com


